V-LIB PRO USER GUIDES
INTRODUCTION
PART ONE: FEATURES
OF VLIB PRO
1.1 Administrator Functions
Feature
1.4 Common Features among
Administrator, Officer, and Patron Functions
PART TWO: VLIB PRO
FUNCTIONS GUIDE
2.1 Administrator Functions
Guide
PART THREE: QUICK INDEXES
INTRODUCTION
Welcome to VLIB PRO manual. This manual consists of
three parts that will help
you to the insight of the systems. INTRODUCTION will
give you the past overview of the system and the target users, PART I will
explain to you what are the features found in VLIB PRO, PART II will guide you
step by step on how to use the system’s features as mentioned in PART I and PART
III is the FAQ-liked fast index that leads you to PART II.
Before you make any further reference to PART II,
kindly spend some time to go through the manual convention that will be used
though out this manual to ease your understanding of the explanation and
description.
VLIB Pro is an online library system that has
comprehensive features on library automation to cater for the needs of the
users. Types of functions or activities
that can be performed by the system are based on the Role that being grant
(Admin, Officer, Patron), and the user hierarchy has been pre-determined. The features of the system can be summarized
as below:
ü
Authentication
ü
OPAC
ü
Circulation
ü
Cataloguing
ü
Periodical
ü
Report
ü
Fine Payment
Maintenance
ü
Personalization
ü
Patron
Management
ü
Vendor
Management
ü
Administrative
Maintenance
ü
System
Configuration
ü
Acquisition
1) User Authentication
·
Access control
to authorized users
·
Feature access
authority to authorized users
·
Patron account
expiration reminder
2) OPAC
·
Online/LAN
access to library catalogue
·
Provide inquiry
for item details and status
·
Quick search –
selected field searching
·
Advanced search
– boolean searching for combination of fields
·
Browse search –
alphabetical list of field heading searching
·
Web search –
direct link to web search engines for further
searching
·
Customized
search preference
·
Staff mode
search result
·
Patron mode
search result
·
Patron direct
reserve
3) Circulation
·
Book &
Serial Circulation
·
Loan
·
Return
·
Extend
·
Reserve
·
Patron current
activities
·
Patron
transaction history
·
Overdue warning
·
Circulation
limit control
·
Fine payment
maintenance
·
Fine limit
control
·
User-friendly
circulation mode switching control
·
Customized
circulation rules and regulation
4) Self Circulation
·
Allow patrons
to perform circulation functions with restricted rules.
5)
Cataloguing
· Add
· Delete
·
Update
·
Catalog item
details
·
Catalog
maintenance
·
Customized
cataloging fields selection
6)
Serial
Cataloguing
· Add
· Delete
·
Update
·
Catalog item
details
·
Catalog
maintenance
7) Photo Indexing
· Add
· Delete
·
Update
·
Catalog item
details
·
Catalog
maintenance
8)
Audio/Video
Cataloguing
· Add
· Delete
·
Update
·
Catalog item details
·
Catalog
maintenance
9) Digital Content Cataloguing
· Add
· Delete
·
Update
10) Periodical
·
Allow check-in
and check-out for serial subscription
·
Prediction of
subscription arrival date
·
Incomplete/unreceived
collection reminder
11) Statistics
·
Reports of Physical Collection
·
Reports of
Circulation
·
Statistics of
Book
·
Statistics of
Circulation
12) Configuration
·
Configure
system access level/user type
·
Configure
circulation rules and regulation
·
Configure
cataloguing field options
·
Configure web
links
13) Patron Management
·
Manage patron
profile
·
Add
·
Delete
·
Update
·
Search
14) Personalization
·
User profile
self-update
·
Change password
·
Customized
search preference
·
Customized web
link groups
·
Customized
front pages for VLIB PRO and each roles main page
15) Vendor
Management
·
Manage vendor
profile
·
Auto-update
vendor selection in cataloguing
·
Add
·
Delete
·
Update
·
Search
16) Administrative
Management
·
Sign up /
delete administrative user
·
Manage
administrative user profile
·
Search
administrative user profile
Target Audiences
Administrator
Administrator is the power user of the system that
has the highest authority to prevent or allow you from using the system
Administrator administers this system and in-charge
of signing-ups and deletes membership for other Administrator and Officers, and
configures the system to cater for the need of the Officer.
There are many configurations that can be made and
will be explained in detail in PART I (features of VLIB PRO for Administrator).
Officer is the one who manage library items
circulation, cataloguing and reporting by using this system. Tasks involve are the
§ Library items Circulation – to borrow, return,
extend, reserve and check
the history of the library
item for Patron.
§
Books
Cataloguing
– to add, delete, add item, delete item and update
details of the books.
§
Serial
Cataloguing
– to search, add, delete, update, check-in the
subscribed magazines or
journal.
§
Photo
Indexing –
to search, add, delete, update photo
§
Audio/Video
Cataloguing
– to search, add, delete, and update
audio/video.
§
Digital
Content Cataloguing – to search, add, delete, and update article.
§ Reports – to generate Book Report and
Serial Report, Circulation and
Book
Statistics.
Two management roles are involved. First is the Patron Management, which
involves to signup new patron, update, delete, and search for their profiles,
and to manage the fine payment.
Secondly is the Vendor Management, which involves to add, delete,
update and search vendors that supply the library items.
The Officer may also change password, update
profile, and define search preference.
PART I explains the features of an Officer in VLIB PRO, and PART II
guides you step by step to use the mentioned features.
Patron
Patron is the person who borrows and returns books
from the library. They can also online
extend and reserve books. Patron can
update their profiles and change password; view their account status on library
item they have borrowed, past due, reserved and extended, and check for the due
date; and finally define their own search criteria. Officer at VLIB PRO can only make new member registration.
Naming Conventions
Convention Used for
![]()
Italic field names in Display Pane
‘Button
Name’ button name
Bold functions in Role Menu
System Interface
Labeling Conventions
![]()
![]()
![]()
![]()

Figure
1: Screen Layout
Role Menu
Common Menu
Display Pane
Functional
Menu
|
Label |
Description |
Role Menu
|
Menu
that appears at the top right of the screen. It varies based on Role. |
|
Functional
Menu |
Set
of tabs with icons that appear under the Role Menu. It varies based on
Role. |
Display Pane
|
Area
that appear under the Functional Menu. It displays the clicking result
at Role Menu and Functional Menu’s icons. |
Common Menu
|
Menu
that appears at the top right of the screen that consists Home, Contact Us,
Logout |
Standard Terms Used
*-marked This refers to
the required /mandatory fields that need to be filled
in a form.

This
icon is reminder that the output or result shown may differ
from what you get by
following the steps gave.

This icon is reminder that the input values used are just example. Therefore you should type in the value you want.
Please
take note that for each explanations in PART II are just examples. It could be
totally different from your context. Therefore, only the steps should be
regarded.
PART ONE: FEATURES OF V-LIB PROFESSIONAL
This
part will explain each and every feature that can be found in V-LIB PRO by
going through the role starting from Administrator to Librarian to Patron, till
the common features that can be found for each Role in V-LIB.
1.1
Administrator Functions Feature
After
an Administrator has successfully login into the system, he/she shall see the
Main Page as shown in Figure 2.

Figure 2:
Administrator Main Page
From
Figure 2, you can see the Role Menu that consists of 4 main parts:
· Administrative – Registration, User List
· Configuration – User type, Cataloging,
Circulation, Contact Info, Tag
Setup, User Access, Date
· My Account – My Profile, Change Password, Search
Preference
· Vendor Management – Add, Delete, Update, Search
Functional
Menu
consists of OPAC Tab and Acquisition Tab

Figure
3: Administrator Role Menu
As
we have mentioned earlier, Administration has three main roles that appear at
the Role Menu as shown in Figure 3.
![]()
Figure
4: Administrator Sub Role Menu - Administrative
![]()
Figure
5: Administration Sub Role Menu – Configuration
![]()
Figure
6: Administration Sub Role Menu – Vendor Management
Administration has two-sub main roles
menu, Configuration has seven-sub main roles menu and Vendor Management
has three sub main roles as shown in Figure 4, Figure 5 and Figure 6:
Administrative includes:
Registration – to
register new Administrator or Officer by assigning
them User ID and their Access
Level to access to the system
User List – to search
user by role.
Configuration includes:
User type – to add/remove user type for each of the Role.
Permission to access features in this system will be granted to users based on
their role. Different user type under the role of ‘PATRON’ is imposed with
different circulation rules and regulation.
Cataloging – to add/remove each type of the Catalogue
Fields. The administrator
can preset option for selected document fields.
Circulation – It is divided into general, book, serial
circulation rules and regulation to define the maximum number of loan items,
the maximum load day, maximum time to extend, fine rate per day, maximum number
of reserve items, maximum fine limit, and maximum day to reserve items by each
user type of Patron.
Update
Info - It is the configuration of three things;
· Contact Info – To
update a contact info
· Links – To configure
of other related links that appear on main page. Administrator can create new
group to add new web links or to add new web links into the existing group.
· Email Setup – To edit
email configuration
Tag Set Up – to configure
MARC tag
User Access – To
configure User Access and Admin Access
Date – to select a branch to list out related date
configuration for fine payment
Exclusion.
Vendor Management includes:
Add – to add new Vendor
that supplies library items.
Delete – to remove Vendor
that no longer supplies library items
Update – to update the
details of the supplier
Search – to search for
the vendor and view their details only.
My
Account
that appears is the common feature that exists among Administrator, Officer,
and Patron. Please refer Section 1.4.2 (Common Features).
![]()
Figure
6: Administrator Functional Menu
Administration
has two main functional that appear at the Functional Menu as shown in
Figure 6.

Figure
7: Administrator Functional Menu – OPAC Tab
OPAC tab as shown in Figure 7 is
the only Functional Tabs that appear when an Administrator login to the system.
OPAC tab consists of five buttons; which they’re Physical Collection,
Audio/Video, Digital Content, Photo, and Serial. Please refer Section 1.4.3
(Common Feature).

Figure
8: Administrator Functional Menu - Acquisition
Acquisition tab as shown in Figure 8 is
the only Functional Tabs that appear when an Administrator login to the system.
It is to create new and list the order.
After
an Officer has successfully login into the system, he/she shall see the Main
Page as shown in Figure 9.

Figure 9: Officer Main Page
From
Figure 9, you can see the Role Menu that consists of 2 main parts:
· My Account – My Profile, Search Preference,
Change Password
· Patron Management – Sign Up, Profile Update,
Profile Delete, Profile
Search, Current Activities,
Fine Payment
Functional
Menu
consists of:
· OPAC tab – to search for library items
· Circulation tab – to borrow, return, extend, reserve,
view history of the
library
items
· Cataloging tab – to maintain library books and book
items
· Statistics tab – to maintain library circulation and
book.
· Acquisition tab - to create new and list the order.
Display
Pane
consists of 2 main parts also, which are:
§
Feature Highlight – this is the related
link to the Role Menu and
Functional Menu
§
Web Links – these are the links that
will lead to the other website in
Internet.

Figure
10: Officer Role Menu
Officer
has only one-management roles that appear at the Role Menu as shown in
Figure 10.
Basically
Patron Management module stores patron details such as Patron ID, name,
user type, address, phone number, account expiration date and etc. The user
type reflects the membership category of a patron. Each user type enjoys
different privileges based on the circulation rules and regulations.
Sign Up – to sign up new Patron membership
Profile Update – to update Patron’s profile
Profile Delete – to delete/remove Patron’s membership
Profile Search – to search for patron and view Patron’s
profile only
Current Activities – to view the Patron’s account status and
details of current
activities
Fine Payment – to manage the fine payment of the Patron (if they
have been
fined)
My
Account is
the common feature that exists among Administrator, Officer, and Patron. Please
refer Section 1.4.2 (Common Features)

Figure
11: Officer Functional Menu – OPAC Tab
Figure
11 shows the Functional Tabs that appear. For OPAC feature, please refer
Section 1.4.3 (Common Features)

Figure
12: Officer Functional Menu – Circulation Tab
Figure
12 shows the Circulation Tab.
VLIB PRO Circulation module provides functionality for book and serial circulation. Patron ID is used to perform the circulation. However, Officer may also use library item barcode for automatic return or extend of the library items without Patron ID. Information such as library items title and return date are shown when patron borrow, return or extend library items. For library items reservation, the estimate date and due date for reservation are also displayed for the convenience of users.
Circulation rules and regulation such as maximum number of loan library items, maximum loan day, maximum times to extend, maximum number of reserved library items, maximum day to reserve, fine rate per day, are imposed to patron based on their user type.
Fine module displays current total fine of a specified patron, limits circulation action for patron whom total fine exceed maximum fine limit and allows librarian to perform fine payment transactions.
Patron current activities module shows number of library items currently borrowed, past due, extended and reserved by a patron. Library items title, return date, number of times has been extended, and overdue warning are displayed.
There
are five activities that can be done at Circulation Tab:
§
Borrow – to lend library items to
the Patron.
§
Return – to accept the return of
library items from Patron.
§
Extend – to extend library items
the Patron has borrowed.
§
Reserve – to reserve book for
Patron so that they can borrow it when it
is available.
§
History – to view all circulation
actions that have been performed by a
patron, including borrow, return,
extend, reserve and cancel
of library items, date and time of action
performed. There are
two sub-modules: today transaction and
history transaction.

Figure 13: Officer
Functional Menu - Cataloging Tab
Figure 13 shows the Cataloguing Tab.
Cataloging module allows officer to perform the below stated activities. This is the module that manages the inventory of the library items. They are five category of inventory; Physical Collection, Serial, Photo, Audio/Video, and Digital Content. Details of these such as title, call number, author, ISBN, edition, price and etc. are stored and can be updated here. Each library item is indexed with a unique barcode number for fast accessibility. It is also labeled with status ‘AVAILABLE’, ‘BORROW’ and ‘RESERVED’ to show its availability in library.
There
are five activities that can be done at Cataloguing Tab:
§
Add – to add new books record.
§
Delete – to delete books that no
longer exist.
§
Add Item – to add items of the
existing books.
§
Delete Item – to delete items of the
existing books.
§
Update
Detail – to
update books or book items.

Figure
14: Officer Functional Menu – Statistics tab
Figure 14 shows the Statistics Tab.
Statistics
module offers 3 categories that are User List, Report, and
Statistics. In the User List category, officers can view the entire
registered patron. Report offers a number of reports to enable Officer
in keep tracking patron, and library items. Officer may be able to list out all
patrons or categorized the listing based on patron user type. Also, all books
and serials can be obtained in this module. Officer may also list out reserved
books and serials based on particular date in order to ease arrangement of
reserved library items for collection. Statistics can be view a graph.

Figure
15: Officer Functional Menu – Acquisition Tab
Figure 15 shows the Acquisition Tab.
Acquisition
module allows officer:
· Order – To create a new order and view a latest
order.
· Receiving – To list out an Item Receive
· Update Cataloging – To list of book order to be
moved to cataloging
· Claim – to claim payment
After
a patron has successfully login into the system, he/she shall see the Main Page
as shown in Figure 16.

Figure
16: Patron Main Page
From
Figure 16, you can see the Role Menu that consists of only:
· My
Account – My Profile, Search Preference, Change Password, My Activities
Functional
Menu consists of:
· OPAC Tab – to search for library item
· Circulation Tab – to extend, reserve, view history of
the library items
Display
Pane consists of 3 main parts also, which are:
· Feature
Highlight – this is the related link to the Role Menu and
Functional Menu
· Web
Links – these are the links that will lead to the other website in
Internet
My
Account is
the common feature that exists among Administrator, Officer, and Patron. Please
refer Section 1.4.2 (Common Features)
![]()
Figure
17: Patron Role Menu
My
Activities
is the only different feature Patron has. My Activities shows the library items
borrow status such as:
· Number of library items borrowed
· Number of library items past due date
· Number of library item reserved
· Number of library items extended
· Details of the library items borrowed and due date

Figure
18: Patron Functional Menu – OPAC Tab
There
are two Functional tabs that appear after a Patron has sign-in to VLIB PRO as
shown in Figure 18.
For
OPAC tab, please refer Section 1.4.3 (Common Features).

Figure
19: Patron Functional Menu – Circulation Tab
This is the self-circulation the mention in INTRODUCTION. It allows patrons to extend or reserve library items at their own online.
At Circulation
tab, a Patron can:
· Extend – to extend the library items, which has
been borrowed.
· Reserved – to reserve the library item that is
currently not available.
· History – to view the library items history
including borrowed items,
reserved items, cancellation
of the borrowed or reserved
1.4
Common Features among Administrator, Officer, and Patron Functions
1.4.1
User Authentication
VLIB PRO provides access control to authorized users by prompting a unique user name and password before entering the system. After valid authentication, authorized users are allowed to access different features in this system based on their role. A reminder will be shown to users 30 days before account expiration. Unauthorized user or user whom account has expired is prohibited from accessing the system.
1.4.2
My Account (My Profile, Search Preference, Change Password)

(Administrator)

(Officer)

(Patron)
Figure 20: Role Menu for
Administrator, Officer, and Patron
At the Role Menu of each Role,
we can see their common features as it is so called personalization mentioned
in INTRODUCTION:
· My Profile – to view and edit personal profile
· Search Preference – to define own search
criteria or the information of
the found library items to be
displayed when you do the search.
· Change Password
– to change sign-in password
1.4.3
OPAC Tab

(Administrator)

(Officer)

(Patron)
Figure 21: OPAC Tab for Administrator, Officer,
and Patron
VLIB PRO OPAC provide multitude of searching functions to ease users in retrieving library catalogues. OPAC can be accessed through both Internet and LAN. It provides inquiry for both book and serial item details and current item status in library.
Simple – is the simple search that used to search for books based on book title, ISBN,
publisher, author, and search for serial based on serial title and ISSN.
Advanced – is the search that allows user to select all fields or any combination fields of
choices to perform complex searching for book and serial.
It returns search result based on user’s search preference. Officer mode search result shows all details of a book or serial, whereas Administrator mode and Patron mode search result shows only general details of a book or serial.
Patron will be able to directly reserve an available book or serial after successfully search for their favorite item.
PART TWO: V-LIB PRO FUNCTIONS GUIDE
How To Start Using V-LIB?
When
you first load V-LIB, you shall see the main page as shown in Figure 1. In this
main page, you are free to click on any link as you wish that will lead you to
other website. Or if you wish to sign-in, type the User Name and Password
that appear on the top of the screen then click ‘Login’.


Figure
22: Main Page (Index Page)
2.1
Administrator Functions Guide
Q1.
How To Signup New System Administrative User?
![]()
Figure
23: Administration Role Menu
Step
1
Click Administration
at the Role Menu as shown in Figure 23, and you shall get the below tab as
shown in Figure 3.
![]() Step 2
Step 2
Figure
24: Administrator Click Registration
at tab as shown in Figure
Role Menu – Registration 24 and you shall get
the below form as
Shown in Figure 25.

Figure
25: Officer Registration Form
Step
3
Fill the Username (6-20
characters), and select the Access Level.

Step
4
Click ‘Submit’. If succeed, you shall
see the following message.
![]()
Step
5
To clear all fields, click
‘Reset’.
Q2. How To Find For An Administrator or An Officer
Profile?
![]()
Figure
26: Administration Role Menu
Step
1
Click Administration
at the Role Menu as shown in Figure 26, and you shall get the below tab as
shown in Figure 27.
![]() Step 2
Step 2
Figure
27: Administration Click User List that
appears under
Role
Menu – User List Administration
at the Role Menu as shown
in Figure 6 and you shall
get the below
form as shown in Figure 28.

Figure
28: List Of Users Form
Step
3
Select the Search By Role.
Step
4
Click ‘Search’. If succeed, you
shall see the information as shown in Figure 29.

Figure
29: List Users Form - Result
Q3. How To Edit And Delete For An Administrator
Profile?
![]() Step 1
Step 1
Figure
30: Administration Click User List that
appears under
Role
Menu – User List Administration
at the Role Menu as shown
in Figure 30 and you shall
get the below
form as shown in Figure 31.
Step
2
Select the Search By Role.

Figure
31: List Of Users Form
As you can see, there are different links at the
right side. To edit go to Step 4 and delete go to Step 5.
Step
4
Click ‘Search’ and will be appear the information as
shown in Figure 32, and click ‘Edit’ of the person(s) you want to edit that
appear on the right of the screen.

Figure
32: List Of Users Form – Edit
You shall get the below
information as shown in Figure 33.

Figure 33: Administrator Profile
Fill your information profile as
shown in Figure 34.

Figure
34: Administration profile – Result

To confirm the profile, click
‘Update’.
Step
5
Click ‘Delete’ of the person(s) that you want the
deletion to take effective as shown in Figure 35.

Figure
35: List Of Users Form – Delete
The Pop Up message will be
appears and Click ’Ok’ to delete an Administrative
user.

Refer to Figure 36, the list of
user ‘lina’ doesn’t have been shown.

Figure
36: List Of Users Form – Delete Result
Q4. How To Configure User
Type for Admin, Officer and Patron?
![]()
Figure
37: Administration Role Menu
Step
1
Click Configuration
at the Role Menu as shown in Figure 37 and you will see Figure 38.
![]()
Figure
38: Sub Administration Role Menu – User type
Step
2
Click UserType that
appear under Configuration at Sub Role Menu as shown in
Figure 38 and you will see Figure 39.

Figure
39: Usertype Configuration
Step
3
Fill the Usertype and Description
and select the Role. Click ‘Insert’ at the right
side as shown in Figure 42.

As you can see in Figure 39, there are different
link in the right list.
To edit go to Step 4, to delete go to Step 5.
Step
4
Click ‘Edit’ and Figure 40 will
be appear.

Figure
40: User Type – Edit
Type the word in the textbox and
click ‘Update’, and the changes will be update.
Otherwise, just click ‘Cancel’.

Step
5
To delete UserType, click
‘Delete’ at the right and pop up ‘Confirm Delete’ will
be appear will be appear.

Click ‘Ok’ and the UserType
selected will be removed.
Q5. How To Configure The Cataloging Fields Options?
![]()
Figure
41: Administration Role Menu
Step
1
Click Configuration
at the Role Menu as shown in Figure 41, and you shall get the below tab as
shown in Figure 42.
![]()
Figure
42: Administration Role Menu – Cataloging
Step
2
Click Cataloging that
appear under Configuration at Role Menu as shown in
Figure 42 and you will see Figure 43.

Figure
43: Cataloging Configuration – Catalog Field Selection
There are 7 Catalogue Fields
that can be configured (edit/delete); which are
Cataloging Level, Material Type, Document Type,
Subject, Main Page Intro,
Kelas and Email
Step
3
Click the dropdown textbox,
select and click ‘Go’.
For instance, Subject has
been selected and Figure 44 will be appearing.


Figure
44: Cataloging Configuration – Edit/Delete
To edit go to Step 4, and to
delete go to Step 5.
Step
4
To edit item from the list,
click on the item at the right side and click ‘Edit’, and
you will see Figure 45.

Figure
45: Cataloging Configuration – Edit
Type the new word in the textbox, and click ‘Update’
at the right side and the new Subject that you have change will be
appear in the list. Refer to Figure 46. Click ‘Cancel’ to not make any changes
at the item.

Figure
46: Cataloging Configuration – Edit Result
Step
5
To delete item from the list, click
on the item at the right side and click ‘Delete’,
and that item will be removed from the list.
Q6. How To Configure Circulation Rules and
Regulations?
![]()
Figure
47: Administration Role Menu
Step
1
Click Configuration at
the Role Menu as shown in Figure 47, and you shall get the below tab as shown
in Figure 48.
![]()
Figure 48: Administration
Role Menu – Circulation
Step
2
Click Circulation that
appear under Configuration at Role Menu as shown in
Figure 48, and you will see Figure 49

Figure 49: Circulation Configuration – User type Selection
Please
take note that the list of User type that appear as shown in the above figure
is depending on the configuration of User Type made for Patron as
describe in Q4 (How To Configure User Type for Admin,
Officer and Patron?)
Step
2
Click the dropdown textbox,
select the User Type and click ‘Go’, and you will see
Figure 50.

Figure
50: Circulation Configuration – The Form
As
you can see, there are basically three parts that you can see on the screen:
· General
Circulation Rules & Regulation Configuration – To configure the Maximum
Fine Limit.
· Rules
& Regulation Configuration of Book Circulation – To configure Maximum
borrow day, Maximum times of extend, maximum no. of reserve book, Maximum no.
of borrow book, Fine rate per day, and
Maximum day to reserve book.
· Rules
& Regulation Configuration of Serial Circulation – To configure Maximum
borrow day, Maximum times of extend, Maximum no. of reserve serial, Maximum no.
of borrow serial, Fine rate per day, and Maximum day to reserve a serial.
Step 3
Change the setting as you wish and click ‘Submit’
button.
Bear in mind that all fields accept Integer except Fine
rate per day (book and serials) and Maximum fine limit, which
accepts fraction number.
Click ‘Reset’ if you want to restore back to the
previous data.
Below is the possible message that will show if the
update succeeds.
![]()
Q7. How To Configure Web Link Group?
![]()
Figure
51: Administration Role Menu
Step
1
Click Configuration
at the Role Menu as shown in Figure 51, and you shall get the below tab as
shown in Figure 52.
![]()
Figure 52: Administration
Role Menu – Update Info
Step
2
Click Update Info that
appear under Configuration at Role Menu as shown in
Figure 52 and you will see Figure 53.

Figure
53: Selecting Update Info - Links
There are four Update Info fields that can be
configure; which are Contact Info, Links, Email Setup, and Main Page
Intro.
Step
3
Choose Links and click
‘Go’. You will get the Figure 54 as shown below.

Figure
54: Web Link Group Configuration
As
you can see, there is a list of Web Link Groups that have been created.


To
add new Web Link Group:
Step
1
Type the new Group Name as shown
in Figure 55.

Figure
55: Filled Add New Web Link Form
Step
2
Click ‘Add’ and you shall see Figure 56 as shown
below (if the new Web Link group added
successful).

Figure
56: New Web Link Group Added
As
you can see, you can start adding any links under this new created Web Link
group.
To
edit existing Web Link group:
Step
1
To edit item from the list,
click on the item at the right side and click ‘Edit’, and
that item will be changed.
To
delete existing Web Link group:
Step
1
Before start explaining the steps on how to delete
Web Link group, you have to understand that there are groups that can be
deleted and groups that cannot be deleted (fixed). By looking at the main page
Figure 6 as shown below, Web Link group with red-bordered-line are the groups
that cannot be deleted.


![]()
Figure
57: Groups that can and cannot be deleted.
Therefore, if you have selected any group in Figure
57 that is from the blue-bordered-line, you are not allowed to delete that
group. Please proceed to see the examples.

Figure
58: Delete Web Link Group
Step
2
To delete Web Link Group from
the list, click on the item at the right side and
click ‘Delete’, and that item will be removed from
the list. See Figure 59.

Figure
59: Delete Web Link Group – Result
To
view links Web Link group:

Figure
60: Web Link Group – View Links
Step
1
Click ‘View Links’ at the right side as shown in
Figure 60 and you will get the Figure 62 as shown below.

Figure
62: Web Link Configuration – View Links
Step
2
Type the word at the text box as
shown in Figure 63.

Figure
63: Filled Web Link Group

Click ‘Add’ button and the new
Magazines group will be added as shown in
Figure 64.

Figure
64: Added New Web Link Group
To
edit go to Step 3 and to delete go to Step 4.
Step
3
Click ‘Edit’ at the right side
and Figure 65 will be appearing.

Figure
65: Web Links Configuration –Edit
Type the word has you want to
change and click ‘Update’ button.
Step
4
Click on the item at the right side and Click
‘Delete’, and that item will be removed from the list.
Q8. How To Customize Contact Info?
![]()
Figure
69: Administration Role Menu
Step
1
Click Configuration
at the Role Menu as shown in Figure 69, and you shall get the below tab as
shown in Figure 70.
![]()
Figure 70: Administration
Role Menu – Update Info
Step
2
Click Update Info that
appear under Configuration at Role Menu as shown in
Figure 70 and you will see Figure 71.

Figure
71: Selecting Update Info – Contact Info
There are four Update Info fields that can be
configure; which are Contact Info, Links, Email Setup, and Main Page
Intro.
Step
3
Choose Contact Info and
click ‘Go’. You will get the Figure 72 as shown below.

Figure
72: Contact Info Configuration
Step
3
Change the setting as you wish and click ‘Update’, and
you will get the result as shown in Figure 73.


Figure
73: Contact Info Configuration – Update Successful
Q9. How To Configure Email Setup?
![]()
Figure
74: Administration Role Menu
Step
1
Click Configuration
at the Role Menu as shown in Figure 74, and you shall get the below tab as
shown in Figure 75.
![]()
Figure 75: Administration
Role Menu – Update Info
Step
2
Click Update Info that
appear under Configuration at Role Menu as shown in
Figure 75 and you will see Figure 76.

Figure
76: Selecting Update Info – Email Setup
Step
3
Click ‘Go’ and you will get
Figure 77 as shown below.
![]()

Figure
77: Email
Step
4
Click ‘Edit’ at the right side
and you will get Figure 78.

Figure
78: Email Setup - Edit
Click ‘Update’ and Email will be
changed.
Q10. How To Customize Main Page?
![]()
Figure
79: Administration Role Menu
Step
1
Click Configuration
at the Role Menu as shown in Figure 79, and you shall get the below tab as
shown in Figure 80.
![]()
Figure 80: Administration
Role Menu – Update Info
Step
2
Click Update Info that
appear under Configuration at Role Menu as shown in
Figure 80 and you will see Figure 81

Figure
81: Selecting Update Info – Main Page
Intro
There are four Update Info fields that can be
configure; which are Contact Info, Links, Email Setup, and Main Page
Intro.
Step
3
Filled the word you want in the Intro Column Left,
Intro Column Right, and browse the picture. Click ‘Update’. See Figure 82

Figure
82: Update Main Page Introduction
Q11. How To Configure Tag
Setup?
![]()
Figure
83: Administration Role Menu
Step
1
Click Administration
at the Role Menu as shown in Figure 83, and you shall get the below tab as
shown in Figure 84.
![]()
Figure
84: Administration Role Menu – Tag Setup
Step
2
Click Tag Setup that
appear under Configuration at Role Menu as shown in
Figure 84 and you will see Figure 85.

Figure
85: Tag Setup Configuration
Step
3
There are 6 Catalog Fields,
which are Book, Serial, Audio/Video, Photo, Photo
Album, and Article.
Type the value you want in the Marc Field
textbox, and choose the fields you want, and click ‘Go’.
Choose the item you want and tick in the box, click
‘Edit’. Type the word you want to change and click ‘Update’. Otherwise click
‘Cancel.’ See Figure 86.

Figure
86: Marc Tag - Edit
Q12
How To Configure User Access?
![]()
Figure
87: Administration Role Menu
Step
1
Click Configuration
at the Role Menu as shown in Figure 87, and you shall get the below tab as
shown in Figure 88.
![]()
Figure
88: Administration Role Menu – User Access
Step
2
Click User Access that
appear under Configuration at Role Menu as shown in
Figure 88 and you will see Figure 89.

Figure
89: User Group Access Configuration
Step
3
Choose the group and fields of
category and click ‘Go’.

Figure
90: User Group Access – Admin – Statistics
Tick in the box at the right
side (in what you want to allow access) to handle
screen for user.

Figure
91: User Group Access - Update
Click ‘Update’ and see
Figure 91.
Click ‘Select All’ to tick all
the boxes.
Click ‘Deselect All’ to untick
all the boxes.
Click ‘Reset’ to back a new
update.
Q13. How To Configuration Date ?
![]()
Figure
92: Administration Role Menu
Step
1
Click Configuration
at the Role Menu as shown in Figure 92, and you shall get the below tab as
shown in Figure 93.
![]()
Figure
93: Administration Role Menu – Date
Step
2
Click Date that appear
under Configuration at Role Menu as shown in
Figure 93 and you will see Figure 94.
Figure 94: Select Branch Form
Step
4
Select Branch at the dropdown
text box. See Figure 95.

Figure
95: Filled Select Branch Form
Step
5
Click ‘Go’ and you will get
Figure 96.

Figure
96: Date Access Form
Step
6
Choose the date to exclude from
calculation for branch. In other words, the public
holiday for the branch. See Figure 97.
Figure
97: Filled Date Access Form
Step 7
After filled all the date, click
‘Save’ and message successfully will be appearing
as shown below.
![]()
![]()
Figure
98: Administration Role Menu
Step
1
Click Vendor Management
at the Role Menu as shown in Figure 98, and you shall get the below tab as
shown in Figure 99.
![]()
Figure
99: Administration Role Menu – Vendor Management
Step
2
Click Add Vendor
that appear under Vendor Management at Role Menu as
shown in Figure 99 and you will see Figure 100.

Figure
100: Add Vendor Form
Step
3
Type (at least) the required
fields (*-marked), as shown in Figure 101.

Figure
101: Filled Add Vendor Form

Step
4
Click ‘Add’. You will get the
successful message if the addition is successful as
shown below.
Click ‘Reset’ if you want to
restore back to the previous data.
![]()
Q15.
How To Update New Vendor?
![]()
Figure
102: Administration Role Menu
Step
1
Click Vendor Management
at the Role Menu as shown in Figure 102, and you shall get the below tab as
shown in Figure 103.
![]()
Figure
103: Administration Role Menu – Vendor Management
Step
2
Click Search Vendor that appear under Vendor
Management at Role Menu as shown in Figure 103 and you will see Figure 104.

Figure
104: Search Vendor Form
You
can Search By Vendor Name to update their profile.
You
can refer to Q17 (How To View For Vendor Profile?)
to learn how to search for the desired vendor until you get to the following
screen (Figure 105) with ‘Update’, ‘Delete’ and ‘Reset’ appear at the bottom
right corner as shown in the below figure.

Figure
105: Vendor Profile
Step
3
Change the profile of the vendor
as you wish (bear in mind that the *-marked
fields should be filled even if you change it).
Step
6
Click ‘Update’ if you have
confirmed you want to make the change(s) take
effective.
Or click ‘Reset’ if you want to restore back to the previous
data.
If the changes succeed, the following successful
message should appear.
![]()
Q16. How To Delete A Vendor?
![]()
Figure
106: Administration Role Menu
Step
1
Click Vendor Management
at the Role Menu as shown in Figure 106, and you shall get the below tab as
shown in Figure 107.
![]()
Figure
107: Administration Role Menu – Vendor Management
Step
2
Click Search Vendor that appear under Vendor
Management at Role Menu as shown in Figure 107 and you will see Figure 108.

Figure
108: Search Vendor Form
You
can Search By Vendor Name to delete their profile.
You
can refer to Q17 (How To View For Vendor Profile?)to
learn how to search for the desired vendor until you get to the following
screen (Figure 109) with ‘Update’, ‘Delete’ and ‘Reset’ appear at the bottom
right corner as shown in the below figure.

Figure
109: Vendor Profile
Step
3
To confirm the deletion, click
‘Delete’.
The deletion succeeds if you see
the following message.
![]()
Q17.
How To View For Vendor Profile?
![]()
Figure
110: Administration Role Menu
Step
1
Click Vendor Management
at the Role Menu as shown in Figure 110, and you shall get the below tab as
shown in Figure 111.
![]()
Figure
111: Administration Role Menu – Vendor Management
Step
2
Click View Vendor that appear under Vendor
Management at Role Menu as shown in Figure 111 and you will see Figure 112.

Figure
111: Search Vendor Form
There are two types you can search the vendor:
· Search
By Name
· Search
By List All
Search By Name
Step
3
Type the Search for text box and select whether it
is Name as shown in Figure 112.

Figure
112: Search Vendor Form – by Name
Click ‘Search’ and The
Figure 113 will be appearing.

Figure
113: Vendor Details
Search By List All
Step
4
Click ‘List All’ and the Figure
114 will be appear as shown.
![]()

Figure
114: Search By List All
Click at the Vendor Name. See
Figure 115.

Figure
115: Vendor Details
Q1.
How To Sign Up New Patron?
![]()
Figure
116: Officer Role Menu
Step
1
Click Patron Management
at the Role Menu as shown in Figure 116, and you shall get the below tab as
shown in Figure 117.
![]()
Figure
117: Officer Sub Role Menu – Sign Up
Step
2
Click Sign Up that appear
under Patron Management at Role Menu as shown in
Figure 117 and you will see Figure 118.

Figure
118: Sign Up Form
Step
3
Choose either System User or ILL User. Get the form filled as in Figure 119. Please make sure
the *-marked fields are filled or else you will get the error message. Below is
the example.

Figure 119: Filled Sign Up Form
Step
4
Click ‘Add Patron’ and if the
patron sign up is successful, you shall see the New
Patron is added in the list. See Figure 120.
![]()

Figure 120: New Added Patron
Q2.
How To Update Patron’s Profile?
![]()
Figure
121: Officer Role Menu
Step
1
Click Patron Management
at the Role Menu as shown in Figure 121, and you shall get the below tab as
shown in Figure 122.
![]()
Figure
122: Officer Sub Role Menu – Profile Update
Step
2
Click Profile Update that appear under Patron
Management at Role Menu as shown in Figure 122 and you will see Figure 123.

Figure
123: Profile Update Form
Step
3
Type the Patron ID that you want
to update their profile.
Step
4
Click ‘Search’ and you shall see
the patron’s details showed.

Figure
124: Profile Update Form – After Search
Step
5
Change the profile of the patron as you wish (bear
in mind that the *-marked fields should be filled even if you change it).
Step
6
Click ‘Update’ if you have
confirmed you want to make the change(s) take
effective.
Q3.
How To Edit Patron’s Photo?
Edit
patron’s photo only possible when:
· Signup new patron
· Update patron’s profile

Figure
125: Signup Patron Form

Figure
126: Update Patron Profile Form – After Searched
As
you can see, there is a ‘Browse’ button at the end of the Photo field. Click
‘Browse’ button to find a source photo. But if there is already a photo and you
wish to change the photo, you can choose to upload the new photo and it will
replace the old one automatically.
![]()
Figure
127: Officer Role Menu
Step
1
Click Patron Management
at the Role Menu as shown in Figure 127, and you shall get the below tab as
shown in Figure 128.
![]()
Figure
128: Officer Sub Role Menu – Profile Delete
Step
2
Click Profile Delete that appear under Patron
Management at Role Menu as shown in Figure 128 and you will see Figure 129.
![]()
Figure
129: Profile Delete Form – Search Patron

Step
3
Type the Patron ID that you
want to delete.
Step
4
Click ‘Go’ and you shall see the
information of the Patron ID you typed appeared
as Figure 130 (if the record found).

Figure
130: Profile Delete Form – After Search
Step
5
Click ‘Delete’ if you confirm to
delete the patron. If the deletion is succeed, you
will see the below message.
Or if you want to cancel
deletion, click ‘Cancel’.
![]()
Q5.
How To Search For Patron’s Profile?
![]()
Figure
131: Officer Role Menu
Step
1
Click Patron Management
at the Role Menu as shown in Figure 131, and you shall get the below tab as
shown in Figure 132.
![]()
Figure
132: Officer Sub Role Menu – Profile Search
Step
2
Click Profile Search that appear under Patron
Management at Role Menu as shown in Figure 132 and you will see Figure 133.

Figure
133: Profile Search Form – Search Patron
Step
3
Type in the keyword to search
and select whether the text you typed is the Patron
ID or the Name of the patron as shown in Figure
134.
![]()
Figure
134: Filled Profile Search Form – Search Patron

Step
4
Click ‘Search’, and you will see Patron ID or
Name you typed (if the
record found)


Figure
135: Patron ID or Name found
Click at the Patron ID,
and you will see the details of the patron displayed in
Figure 136.

Figure
136: Patron Profile
Q6.
How To View A Patron’s Current Activities?
![]()
Figure
137: Officer Role Menu
Step
1
Click Patron Management
at the Role Menu as shown in Figure 137, and you shall get the below tab as
shown in Figure 138.
![]()
Figure
138: Officer Sub Role Menu – Current Activities
Step
2
Click Current Activities that appear under Patron
Management at Role Menu as shown in Figure 138 and you will see Figure 139.

Figure
139: Profile Search Form – Search Patron
Step
3
Fill in the Patron ID as shown
in Figure 140 and click ‘Search’.

Figure
140: Filled Profile Search Form – Search Patron
Please
bear in mind that the input shown above is just an example. You may type
the Patron ID you want to search for.


If the Patron ID exists,
the Figure 141 will be displayed.


Figure
141: Patron Activities
As you can see, this screen shows the summary of the number of library items the patron has borrowed, past due date, reserved and extended, and the list of library items details you borrowed.
Q7. How To Check If A Patron Has Been Fined?
![]()
Figure
142: Officer Role Menu
Step
1
Click Patron Management
at the Role Menu as shown in Figure 142, and you shall get the below tab as
shown in Figure 143.
![]()
Figure
143: Officer Sub Role Menu – Fine Payment
Step
2
Click Fine Payment that appear under Patron
Management at Role Menu as shown in Figure 143 and you will see Figure 144.
![]()
Figure
144: Patron Search Form
Step
3:
Type the Patron ID as shown in Figure 145 and then
clicked ‘Go’ and you will see Figure 146 shows (if the patron exists).

Figure
145: Filled Patron Search Form

Figure
146: Patron Fine Payment Details
Type the amount you want to pay, and then click
‘Pay’.
Please note, if the patron wants to pay, he/she must
return all the items borrow.
Q8.
How To Allow Patron To Borrow Library Item?
![]()
Figure
147: Officer Functional Menu – Circulation
Step
1
Click Circulation at
the Functional Menu as shown in Figure 147, and you shall get the below tab as
shown in Figure 148.
![]()
Figure
148: Circulation Tab – Borrow Button
Step
2
Click Borrow that appear under Circulation
Tab at Functional Menu as shown in Figure 148 and you will see Figure 149.

Figure
149: Search Patron Form
Step
3
Select the borrow type (book or serial) the Patron
wants to borrow, and type the Patron ID. See Figure 150.

Figure
150: Filled Search Patron Form
Please bear in
mind that the input shown above and the following ones are just examples.
You may type the values you want.

Click ‘Go’ and you will see
Figure 151.

Figure
151: Borrowed Item
As you can see, the borrowed
library items will appear in the table (if any).

Please bear in
mind that the table shown above may differ from what you see based on the
book(s) currently borrowed by the patron.
There
are three actions that you can perform.
· ‘Complete’ – To end or cancel the patron session
· ‘Switch To Book’ – To allow patron switch to borrow
book
(depends on which borrow type you have selected on
the previous screen. If Book was selected previously, this button will appear
to be ‘Switch To Serial’).
· ‘Borrow’ –To borrow book.
Step
4
Now that you are required to
type the Book Item ID/Serial Item ID as Figure 152.

Figure
152: Borrow Item – Type Item ID
Step
6
Click ‘Borrow’ and the new
borrowed book will appear in the table as shown in
Figure 153.

Figure
153: Borrow Item – Item Added
As you can see, the new borrowed
book is showed in the table.
Repeat this step to borrow more
library items.
If you want to cancel the
borrowed book, click ‘Cancel’ (red color font) that
appears at the Status column and it will be deleted
from the borrow list.
Q9. How To Return Library Items From Patron?
![]()
Figure
154: Officer Functional Menu – Circulation
Step
1
Click Circulation at
the Functional Menu as shown in Figure 154, and you shall get the below tab as
shown in Figure 155.
![]()
Figure
155: Circulation Tab – Return Button
Step
2
Click Return that appear under Circulation
Tab at Functional Menu as shown in Figure 155 and you will see Figure 156.

Figure
156: Search Patron ID Form
Step
3
Select the return type (book or serial) the Patron
wants to return, and type the Patron ID. See Figure 157.

Figure
157: Filled Search Patron Form
Please bear in
mind that the input shown above and the following ones are just examples.
You may type the values you want

Click ‘Go’ and you will see
Figure 158.
Please take note that the Patron ID you type
exists, and you shall see the following screen.


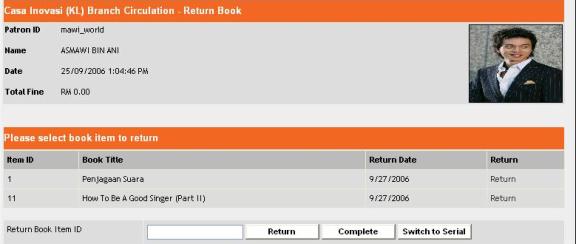
Figure
158: Returned Book Items
As you can see, the list of the borrowed book is shown in the table in Figure 158.
Please bear in
mind that the table shown above may differ from what you see based on the
book(s) currently borrowed by the patron.
Step
4
To return library items, there
are two ways to do sop:
· By
clicking the ‘Return’ that appear at the return column of the table.
· By
typing the Item ID (Book Item ID/Serial Item ID) at the textbox, and click
‘Return’.
Whichever way you use, it will be deleted from the
borrow list.
To return other books, you can repeat Step 4.
Or to return serials, you can switch to serial by
clicking ‘Switch To Serials’.
Or you can click ‘Complete’ to end or cancel the
patron session.
Q10. How To Extend Library Items For Patron?
![]()
Figure
159: Officer Functional Menu – Circulation
Step
1
Click Circulation at
the Functional Menu as shown in Figure 159, and you shall get the below tab as
shown in Figure 160.
![]()
Figure
160: Circulation Tab –Extend Button
Step
2
Click Extend that appear under Circulation
Tab at Functional Menu as shown in Figure 160 and you will see Figure 161.

Figure
161: Search Patron ID Form
Step
3
Select the return type (book or serial) the Patron
wants to return, and type the Patron ID. See Figure 162.

Figure
162: Filled Search Patron Form
Please bear in
mind that the input shown above and the following ones are just examples.
You may type the values you want

Click ‘Go’ and you will see
Figure 163.
Please take note that the Patron ID you type
exists, and you shall see the following screen.


Figure
163: Returned Book Items
As you can see, the list of the
borrowed book is shown in the table in Figure 5.

Please bear in
mind that the table shown above may differ from what you see based on the
book(s) currently borrowed by the patron.
Step
4
To return library items, there
are two ways to do sop:
· By
clicking the ‘Return’ that appear at the return column of the table.
· By
typing the Item ID (Book Item ID/Serial Item ID) at the textbox, and click
‘Return’.
Whichever way you use, it will be deleted from the
borrow list.
To return other books, you can repeat Step 4.
Or to return serials, you can switch to serial by
clicking ‘Switch To Serials’.
Or you can click ‘Complete’ to end or cancel the
patron session.
Q11. How To Reserve Library Items For Patron?
![]()
Figure
164: Officer Functional Menu – Circulation
Step
1
Click Circulation at
the Functional Menu as shown in Figure 164, and you shall get the below tab as
shown in Figure 165.
![]()
Figure
165: Circulation Tab – Reserve Button
Step
2
Click Reserve that appear under Circulation
Tab at Functional Menu as shown in Figure 165 and you will see Figure 166.

Figure
166: Reserve Search Form
Step
3
Select the reserve type (book or serial) the Patron
wants to reserve, and type the Patron ID. See Figure 165.

Figure
165: Filled Search Patron Form
Please bear in
mind that the input shown above and the following ones are just examples.
You may type the values you want

Click ‘Go’ and you will see
Figure 166.
Please take note that the Patron ID you type
exists, and you shall see the following screen.

Figure
166: Reserve List
As you can see, (in this case), there are currently
no book has been reserved (the list is empty).
And there are three actions that you can perform here.
· ‘Reserve’
– To reserve the library items (depends on which reserve type you click on the
previous screen).
· ‘Complete’
– To end or cancel the patron session.
· ‘Switch
To Serial’ – To allow patron switch to borrow book (depends on which reserve
type you click on the previous screen. If Serial was selected previously, this
button will appear to be ‘Switch To Book’).
Step
4
To reserve library items, type the Item ID in the
textbox as shown in Figure 167. and click ‘Reserve’.

Figure
167: Reserve List – Reserve by Item ID
Step
5
Click
‘Reserve’ and you shall see the Item ID (in this case is Book Item ID)
has been added to the table.

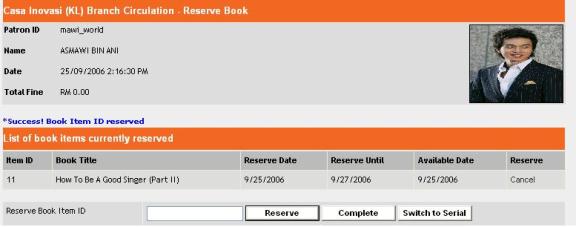
Figure 168: Reserve List – Item Reserved
To reserve more books, repeat Step 4.
To cancel the reserved books, click ‘Cancel’ that
appear at the end of the table (under Reserve column).
To reserve Serial, click ‘Switch To Serial’.
To end or cancel the patron session, click
‘Complete’.
Q12. How To View The Account Transaction History Of
A Patron?
![]()
Figure
169: Officer Functional Menu – Circulation
Step
1
Click Circulation at
the Functional Menu as shown in Figure 169, and you shall get the below tab as
shown in Figure 170.
![]()
Figure
170: Circulation Tab –History Button
Step
2
Click History that appear under Circulation
Tab at Functional Menu as shown in Figure 170 and you will see Figure 171.

Figure
171: History Search Form
Step
3
Select the reserve type (book or serial) the Patron
wants to reserve, and type the Patron ID. See Figure 172.

Figure
172: History Search Form
Please bear in
mind that the input shown above and the following ones are just examples.
You may type the Patron ID you want

Click ‘Go’ and you will see
Figure 173 if the Patron ID exists.
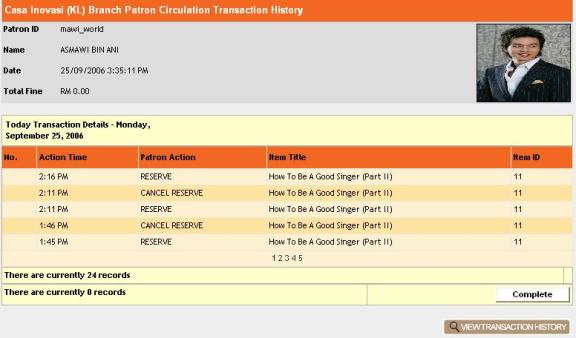
Figure
173: Today Transaction

For your information, Transaction History is divided
into today transaction and history transaction, by default, today transaction
is shown.
You can actually perform two things here:
· To
view the Transaction History by clicking ‘View Transaction History’, or
· To
end or cancel the patron session, click ‘Complete’.
Q13. How To Add New Book?
![]()
Figure
174: Officer Functional Menu – Cataloging
Step
1
Click Cataloging at
the Functional Menu as shown in Figure 174, and you shall get the below tab as
shown in Figure 175.

Figure
175: Physical Collection Tab – Add
Step
2
Click Physical Collection and ‘Add’ that
appear under Cataloging Tab at Functional Menu as shown in Figure 175
and you will see the form as shown in Figure 176.
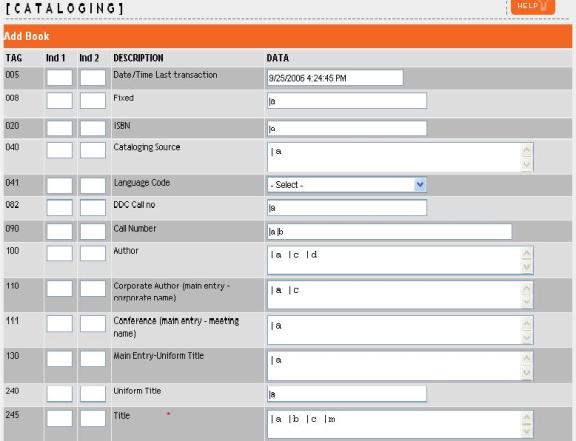
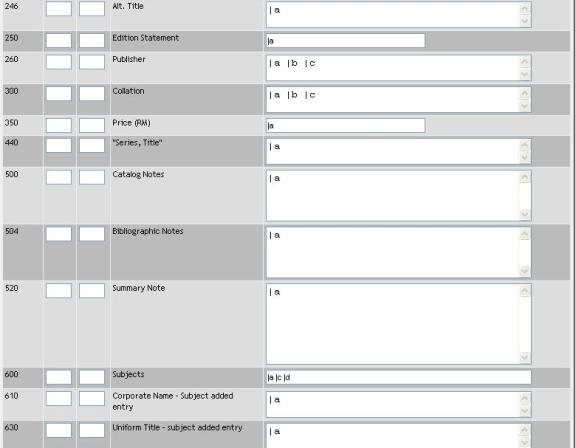
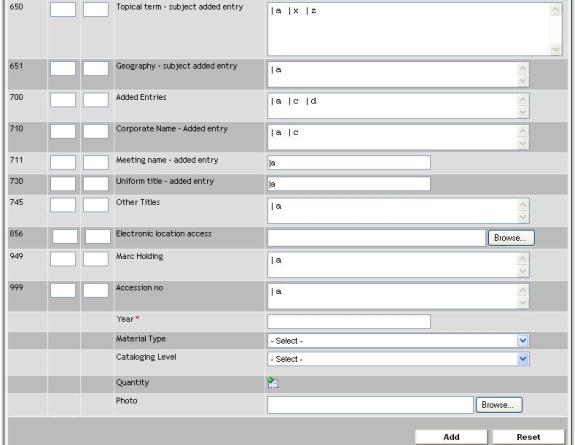
Figure
176: Add Book Form
As you can see, there are many fields that you may
fill up.

Please bear in
mind that the input shown above and the following ones are just examples.
You may type the values you want
Step
3
You may type the Title of the book, and the Quantity
as shown in the previous figure.
Step
4
Click the icon that appear at beside the Quantity
textbox as shown in Figure 177 and you will see Figure 178 shown
![]()
![]()
Figure 177: Quantity Column
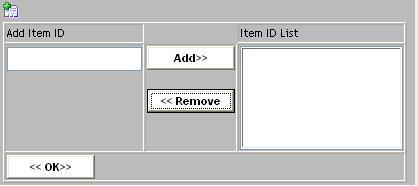
Figure
178: Add Book Item Sub-Form
Step
5
Type the Book Item ID as shown
in Figure 179.
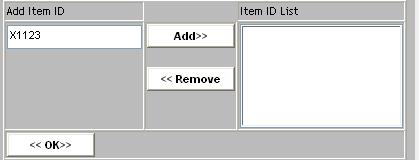
Figure
179: Filled Add Book Item Sub-Form
Step
6
Click ‘Add’ and you shall see the Item ID added on
the other side as shown in Figure 180.
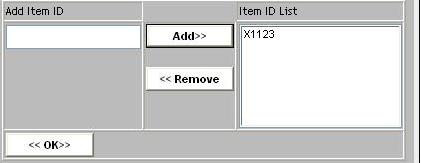
Figure
180: Add Book Item Sub-Form – Item Added
Click ‘Remove’ if you want to remove the Book Item
ID from the list by selecting the Item ID first.
As you will notice (in this case), after the Book
Item ID has been added, the ‘Add’ button turns disabled. This is because the Quantity
you typed was 1. In other case, if the Quantity is 3, the ‘Add’ button
will only be disabled after you have added 3 Book Item ID.
Step
7
Click ‘Ok’ to confirm the addition of the Book Item
ID that you have added, and you shall back to the form again.
Step
8
Click ‘Add’ and this new book shall be successfully
added into the database by returning the following message.
![]()
Q14. How To Delete Book?
![]()
Figure
181: Officer Functional Menu – Cataloging
Step
1
Click Cataloging at
the Functional Menu as shown in Figure 181, and you shall get the below tab as
shown in Figure 182.

Figure
182: Physical Collection Tab – Delete
Step
2
Click Physical Collection and ‘Delete’ button
that appear under Cataloging Tab at Functional Menu as shown in Figure
182 and you will see the form as shown in Figure 183.

Figure
183: Simple Search Book Form
Step
3
Search through simple search:
There are two methods to
used in simple search:
· Search
by List All Book
· Search by Accession No., Author, Call Number, Keyword,
Subject, and Title
Click ‘List All Book’ if you
want to select from the list of all books in the library.
Or, type in the Search for field and select
the criteria you want to search based on the words you typed. See Figure 184.

Figure
184: Filled Simple Search Book Form
Please bear in
mind that the input shown above and the following ones are just examples.
You may type the values you want.

Click ‘Search’ and you shall see Figure 185 shown if
the book found.
![]()

Figure
185: Book Found
Click at the title as shown in
Figure 185. Figure 186 will be appearing.
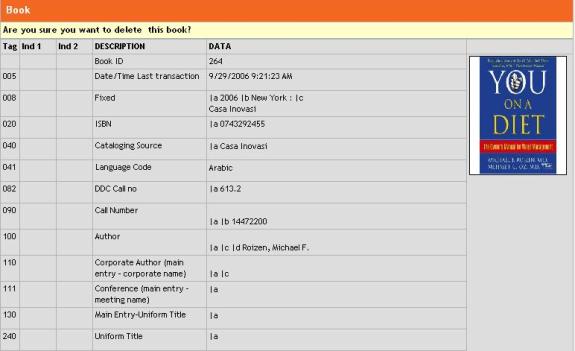
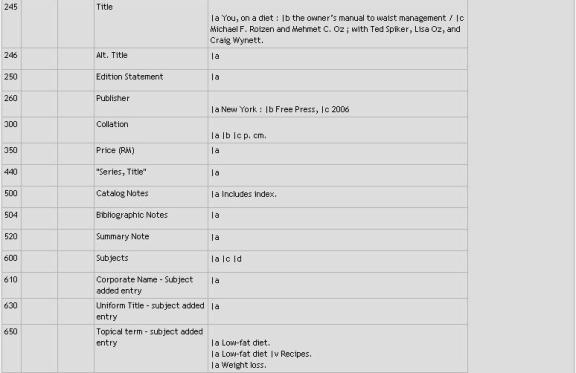
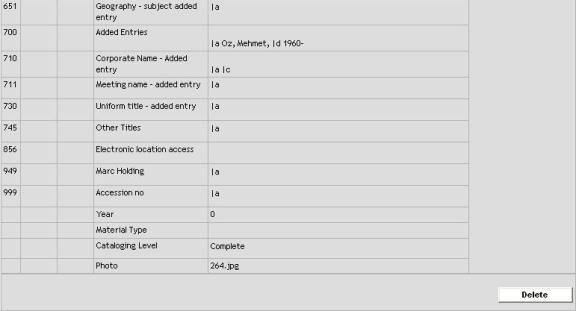
Figure
186: Book Details
Step
4
Click ‘Delete’ if you want to
delete the book and you shall see the following
message if the deletion succeeds.

Please
bear in mind that the book can only be deleted if the status of all items of
the book is Available.
Q15. How To Add New Book Item?
![]()
Figure
187: Officer Functional Menu – Cataloging
Step
1
Click Cataloging at
the Functional Menu as shown in Figure 187, and you shall get the below tab as
shown in Figure 188.

Figure
188: Physical Collection Tab –Add Item
Step
2
Click Physical Collection and ‘Add Item’
button that appear under Cataloging Tab at Functional Menu as shown in
Figure 188 and you will see the form as shown in Figure 189.

Figure
189: Search Book Form
As you can see, there are three
ways to get to the book you want to add item(s):
· Search
via Simple Search
· Search by Item ID
· Search by Book ID
Step
3
After you perform any of the search method above,
you shall see Figure 4 shown if the book found.

Figure
190: Add Book Item Form
As you can see (in this example), the returned book
is titled How To Be A Good Singer (Part II) and the Book ID is 258.
You can actually perform one
thing here:
· To
add the new item of the book
You are advised to checkout the Item ID that you
have used to avoid adding the same Item ID to the new items.
Step
4
Click ‘Enter Item ID’ and you
shall see a window as Figure 191 pop ups.
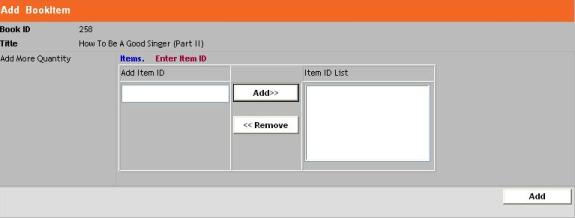
Figure
191: Add Book Item Sub-Form
Step
5
Type 3 Item Ids and add it to
the right list by clicking ‘Add’ as shown in Figure
192.
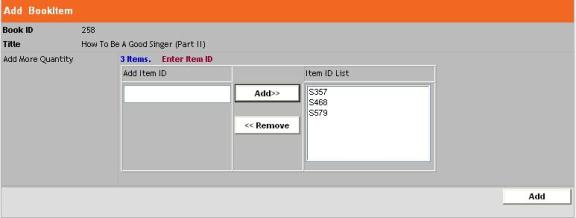
Figure 192: Add Book Item Sub-Form – Items Added
Step
8
Click ‘Add’ and the Figure 193
will be shown.
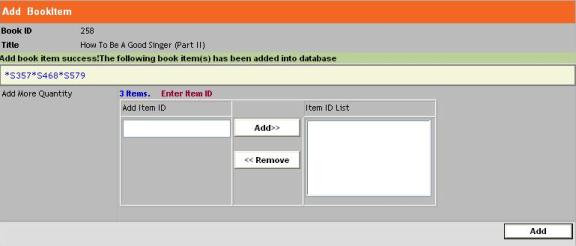
Figure
193: Add Book Item Sub-Form- Success
Step
9
Click ‘Add’ to add that 3 items
into the database.
Q16. How To Delete Book Item?
![]()
Figure
194: Officer Functional Menu – Cataloging
Step
1
Click Cataloging at
the Functional Menu as shown in Figure 194, and you shall get the below tab as
shown in Figure 195.

Figure
195: Physical Collection Tab – Delete Item
Step
2
Click Physical Collection and ‘Delete Item’
button that appear under Cataloging Tab at Functional Menu as shown in
Figure 195 and you will see the form as shown in Figure 196.

Figure
196: Search Book Form
As you can see, there are three ways to get to the
book item(s) you want to delete:
§ Search via Simple Search
§ Search by Item ID.
§
Search by Book ID.
Step
3
After you perform any of the search method above,
you shall see Figure 197 shown if the book found.
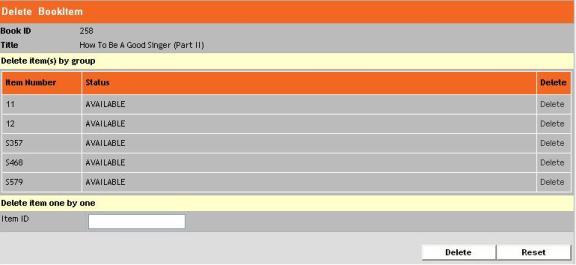
Figure
197: Delete Item Form
Step 4
There
are two ways to delete Item:
· Delete Item(s) by
group
· Delete Item one by
one
Delete Item(s) by group
If you want to delete the Book
Item, click ‘Delete’ (black color font) that
appears at the Delete column and it will be deleted
from the list.
Delete Item one by one
Type the Item ID at the Textbox and click ‘Delete’ as shown in Figure
198. The
Book Item will be
removed.
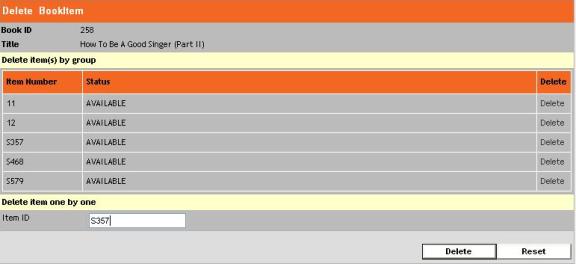
Figure
198: Delete Item Form – Delete by Typing Delete Item ID
Q17. How To Update Book Details?
![]()
Figure
199: Officer Functional Menu – Cataloging
Step
1
Click Cataloging at
the Functional Menu as shown in Figure 199, and you shall get the below tab as
shown in Figure 200.

Figure
200: Physical Collection Tab –Update Detail
Step
2
Click Physical Collection and ‘Update Detail’
button that appear under Cataloging Tab at Functional Menu as shown in
Figure 200 and you will see the form as shown in Figure 201.

Figure
201: Simple Search Book Form
Step
3
Search through simple search:
There are two methods to
used in simple search:
· Search
by List All Book
· Search by Accession No., Author, Call Number, Keyword,
Subject, and Title
Click ‘List All Book’ if you
want to select from the list of all books in the library.
Or, type in the Search for field and select
the criteria you want to search based on the words you typed. See Figure 202.

Figure
202: Filled Simple Search Book Form
Please bear in
mind that the input shown above and the following ones are just examples.
You may type the values you want.

Click
‘Search’ and you shall see Figure 203 shown if the book found.
![]()

Figure
203: Book Found
Click at the title as shown in Figure 203. Figure
204 will be appearing.
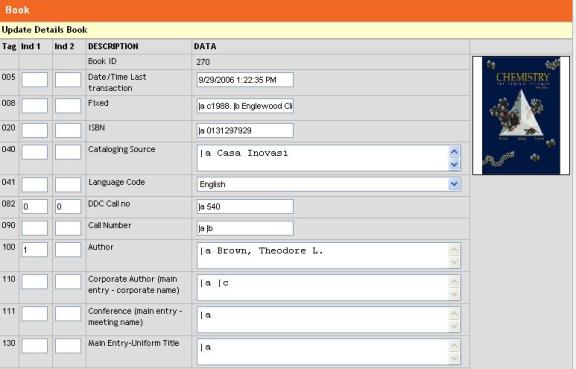
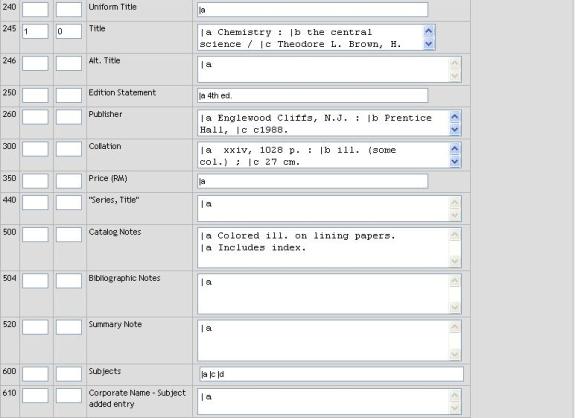
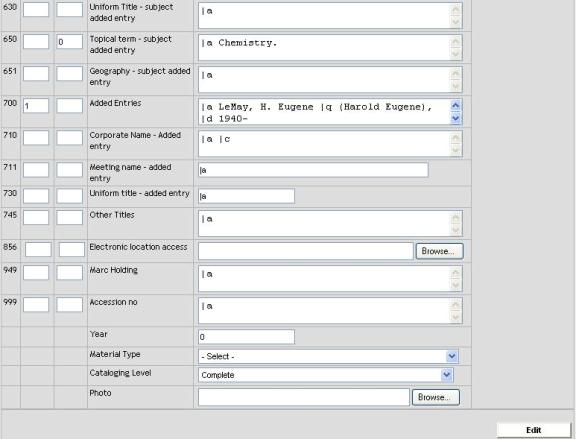
Figure
204: Book Details
Step
4
Type or edit whatever fields you
would like to update in this form.
Step
5
To confirm the change(s), click
‘Edit’ and you shall get the following successful
message if the edition succeeds.

Q18. How To Edit Book’s Photo?
Edit
book’s picture only possible when:
· Add new book
· Update book details
From
the two actions mentioned, you will get to the sample forms shown in Figure 205
and Figure 206 respectively.
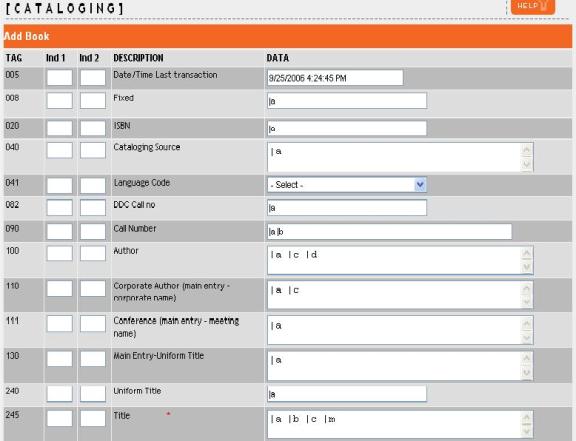
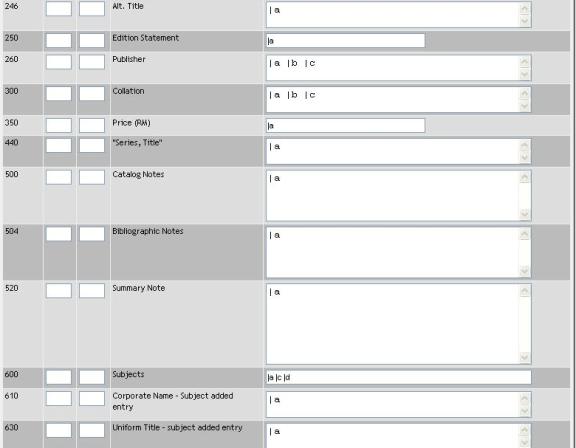
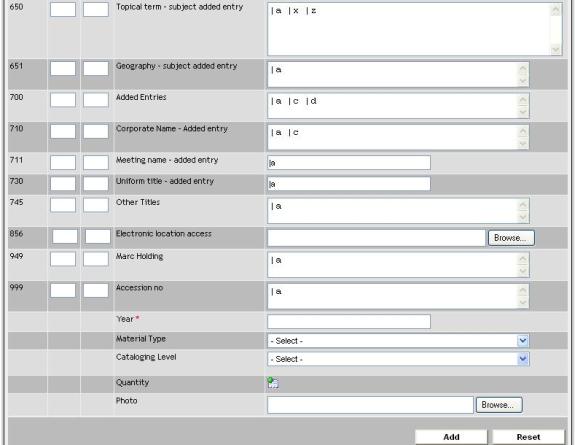
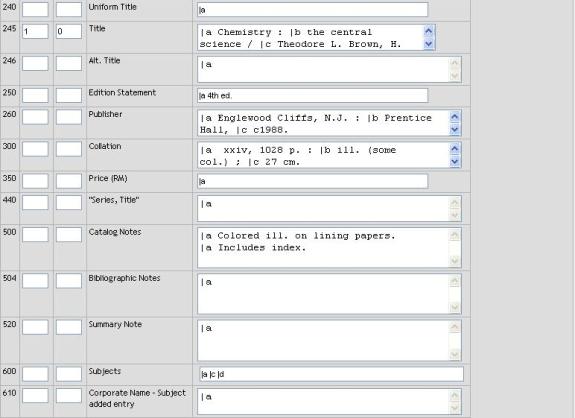
![]() Figure 205: Add Book Form
Figure 205: Add Book Form
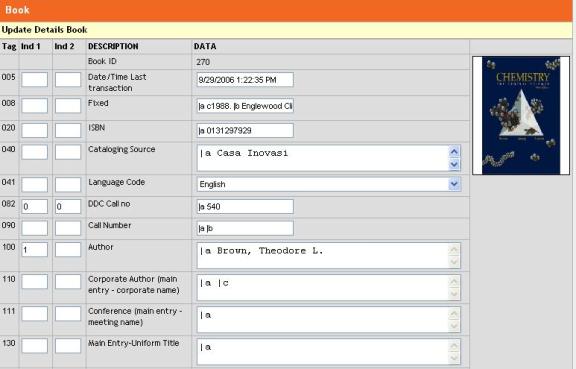
![]()
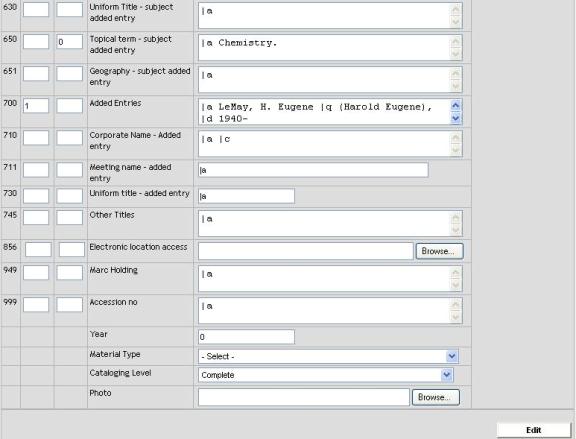
Figure
206: Book Details
As
you can see, there is a Browse’ button at the end of the Photo field.
And under the If you wish to change the photo, you can choose to upload the new
photo and it will replace the old one automatically.
Q19. How To Add New Serial?
![]()
Figure
207: Officer Functional Menu – Cataloging
Step
1
Click Cataloging at
the Functional Menu as shown in Figure 207, and you shall get the below tab as
shown in Figure 208.

Figure
208: Serial Tab – Add
Step
2
Click Serial and ‘Add’ that appear under Cataloging
Tab at Functional Menu as shown in Figure 208 and you will see the form as
shown in Figure 209.
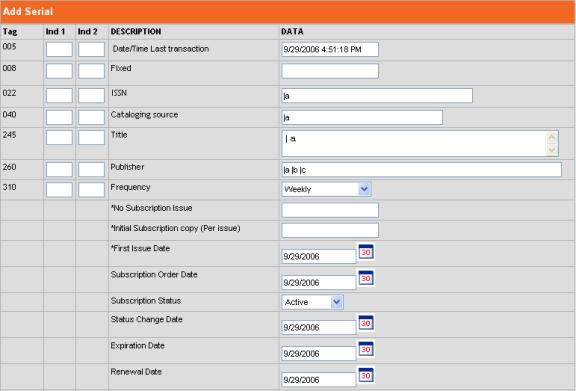
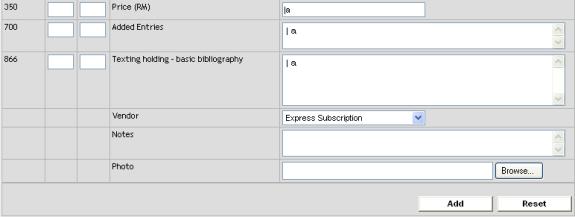
Figure
209: Add Serial Form
As you can see, there are all together 21 fields
that you may fill up but only 3 that need to be filled (mandatory); No. Subscription Issue, Initial Subscription
Copy (per issue) and First Issue
Date.
Step
3
So, type (at least the *-marked) the fields as shown
in Figure 210.
Or click ‘Reset’ to reload a new form
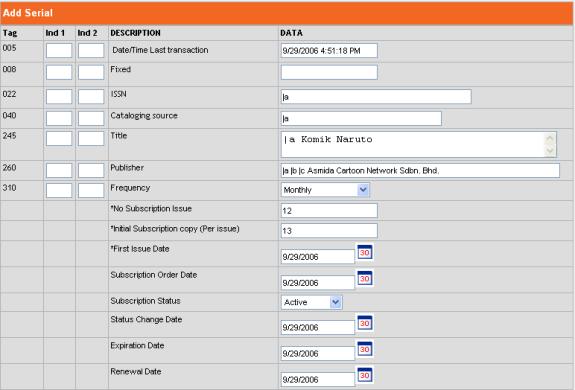
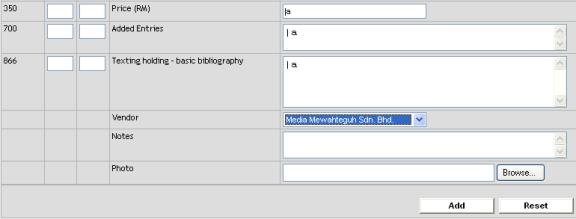
Figure 210: Filled Add Serial
Form

Step
4
Click ‘Add’ and you will see the below if the
addition is successful.
![]()
For your information, the system will automatically
generate list of issue under the serial subscription, and predict the arrival
date of each issue whenever new serial is added into the system.
Q20. How To Delete Serial?
![]()
Figure
211: Officer Functional Menu – Cataloging
Step
1
Click Cataloging at
the Functional Menu as shown in Figure 211, and you shall get the below tab as
shown in Figure 212.

Figure
212: Serial Tab –Delete
Step
2
Click Serial and ‘Delete’ button that appear
under Cataloging Tab at Functional Menu as shown in Figure 212 and you
will see the form as shown in Figure 213.

Figure
213: Simple Search Delete Form
Step
3
Search through simple search:
There are two methods to use
in simple search:
· Search
by List All Serial
· Search
by Title, Subject, Keyword, Item ID, ISSN, Call Number,
and Accession No.
Click ‘List All Serial’ if you
want to select from the list of all serials in the
library.
Or, type in the Search for field and select
the criteria you want to search based on the words you typed. See Figure 214.

Figure
214: Filled Simple Search Serial Form
Please bear in
mind that the input shown above and the following ones are just examples.
You may type the values you want.

Click ‘Search’ and you shall see Figure 215 shown if
the serial found.
![]()

Figure
215: Serial Found
Click at the title as shown in
Figure 215. Figure 216 will be appearing.
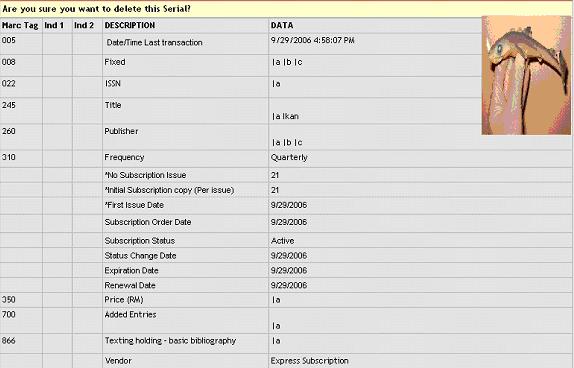
![]()
Figure
216: Serial Details
Step
4
Click ‘Delete’ if you want to
delete the serial and you shall see the following
message if the deletion succeeds.

Please
bear in mind that the serial can only be deleted if the status of all items of
the serial is Available.
Q21. How To Update Serial Details?
![]()
Figure
217: Officer Functional Menu – Cataloging
Step
1
Click Cataloging at
the Functional Menu as shown in Figure 217 and you shall get the below tab as
shown in Figure 218.

Figure
218: Serial Tab –Update Detail
Step
2
Click Serial and ‘Update Detail’ button that
appear under Cataloging Tab at Functional Menu as shown in Figure 218
and you will see the form as shown in Figure 219.

Figure
219: Simple Search Serial Form
Step
3
Search through simple search:
There are two methods to
used in simple search:
· Search
by List All Serial
· Search by Title, Subject, Keyword, Item ID, ISSN, Call
Number,
and Accession No.
Click ‘List All Serial’ if you
want to select from the list of all books in the library.
Or, type in the Search for field and select
the criteria you want to search based on the words you typed. See Figure 220.

Figure
220: Filled Simple Search Serial Form
Please bear in
mind that the input shown above and the following ones are just examples.
You may type the values you want.

Click
‘Search’ and you shall see Figure 221 shown if the book found.
![]()

Figure
221: Serial Found
Click at the title as shown in Figure 221. Figure
222 will be appearing.
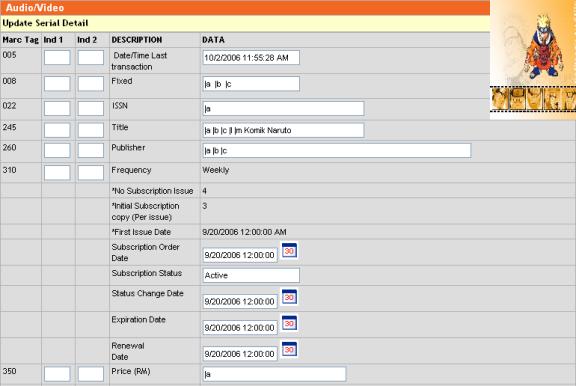

Figure
222: Serial Details Form
Step
4
Change the fields as you like
and click ‘Update’. You will see the following
successful message if the updating is succeeds.
![]()
Q22. How To Check-In Issues of Serials?
![]()
Figure
223: Officer Functional Menu – Cataloging
Step
1
Click Cataloging at
the Functional Menu as shown in Figure 223, and you shall get the below tab as
shown in Figure 224.

Figure
224: Serial Tab –Add Item
Step
2
Click Serial and ‘Add Item’ button that
appear under Cataloging Tab at Functional Menu as shown in Figure 224
and you will see the form as shown in Figure 225.

Figure
225: Simple Search Serial Form
Step
3
Search through simple search:
There are two methods to
used in simple search:
· Search
by List All Serial
· Search by Title, Subject, Keyword, Item ID, ISSN, Call
Number,
and Accession No.
Click ‘List All Serial’ if you
want to select from the list of all books in the library.
Or, type in the Search for field and select
the criteria you want to search based on the words you typed. See Figure 226.

Figure
226: Filled Simple Search Serial Form
Please bear in
mind that the input shown above and the following ones are just examples.
You may type the values you want.

Step
4
Click on the ‘Search’ and you
shall see Figure 227 shown.
![]()
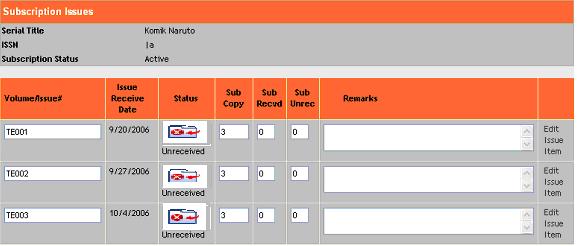
![]()
Figure 227: Check-In Issues
Form – Status Active
Please take note that the pre-requisite to check –in
issue is the Subscription Status
must be Active.
Step
5
![]()
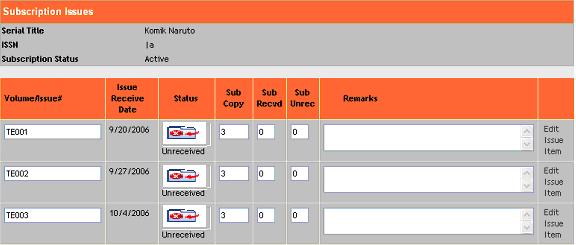
![]()
Figure 228: Check-In Issues
Form – Status Active
As you can see (in this example), there are three
copies that we are supposed to receive for each issue. In the figure above,
there are none has been received. Now we have received those three copies and
want to check-in as items under Issue No. TE001.
Therefore you have to change the received
subscription copy, and the not received subscription copy. You can do so by
editing the Sub. Recvd and Sub Unrecvd. as shown in Figure 229.

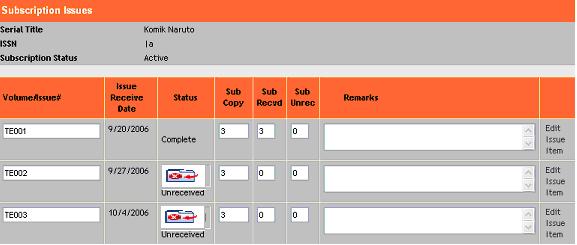
![]()
Figure
229: Check-In Issues Form – Changed Sub. Rcvd and Sub. Unrecvd

Step
6
Click ‘Update’ and the changes
will be update.
Step
7
To check-in the three items of
this issue (TE001), click ‘Edit Issue Item’ that
appear at the last column of the table and you will
see a window pops up as
shown in Figure 230.
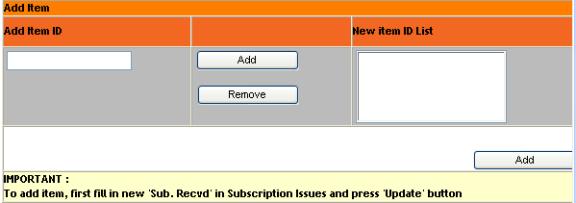
Figure
230: Add Serial Issue Sub-Form
Step
8
Type and click ‘Add’ button to
add the three Issue Item IDs as shown in Figure
231.
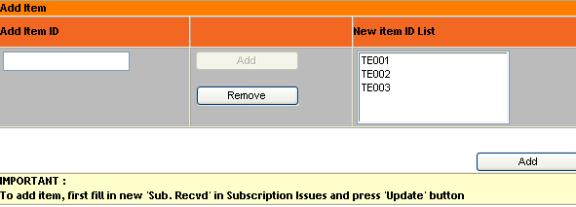
Figure
231: Add Serial Issue Items Sub-Form – Added Serial Item IDs.
To change he Item ID, select the
Item ID on the list and click ‘Remove’.
As you can see, the ‘Add’ button
will turn disabled after you have added three
Item IDs. This depends on the Sub. Recvd you
specified previously.
Step
9
Click ‘Add’ to confirm adding
those three items to this issue, and you will notice
that these three items will appear under this table
if the addition is successful as
shown in Figure 232.
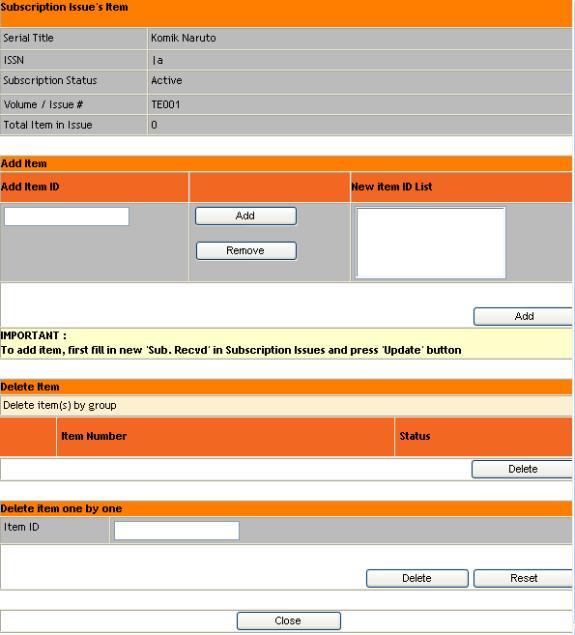
Figure
232: Add Serial Issue Items Sub-Form – Added Serial Items
Step
10
Click ‘Close’ to return to the
main window.
Q23. How To Add New Photo Album?
![]()
Figure
233: Officer Functional Menu – Cataloging
Step
1
Click Cataloging at
the Functional Menu as shown in Figure 233, and you shall get the below tab as
shown in Figure 23434.

Figure
234: Photo Tab –Add
Step
2
Click Photo and ‘Add’ button that appear
under Cataloging Tab at Functional Menu as shown in Figure 234 and you
will see the form as shown in Figure 235.
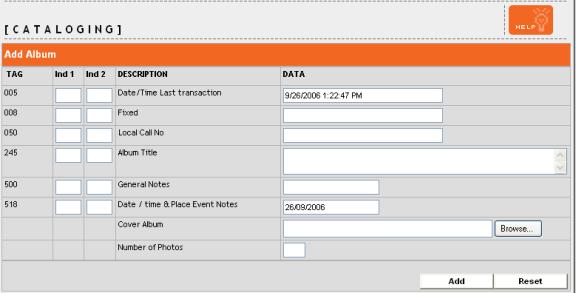
Figure
236: Add Photo Form
As you can see, there are all together 8 fields that
you may fill up. Please refer Figure 237 as an example.
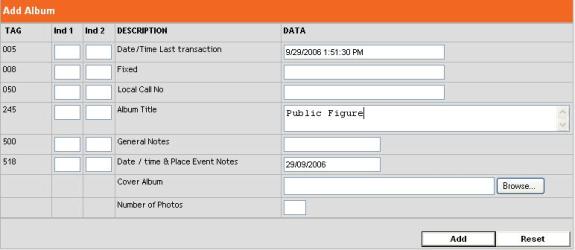
Figure
237: Filled Add Photo Form

Click ‘Add’ button and you will get Figure 238.
Other wise, click ‘Reset’
![]()
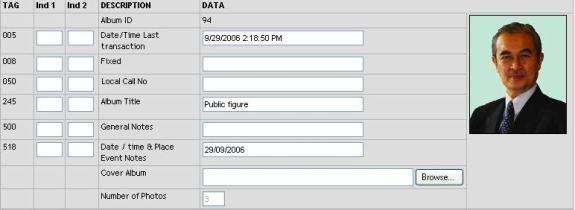
![]()
Figure
238: Filled Add Album
Click ‘Add Album’, if you want
add more album.
Q24. How To Delete Photo Album?
![]()
Figure
239: Officer Functional Menu – Cataloging
Step
1
Click Cataloging at
the Functional Menu as shown in Figure 239, and you shall get the below tab as
shown in Figure 240.

Figure
240: Photo Tab –Delete Button
Step
2
Click Photo and ‘Delete’ button that appear
under Cataloging Tab at Functional Menu as shown in Figure 240 and you
will see the form as shown in Figure 241.
![]()
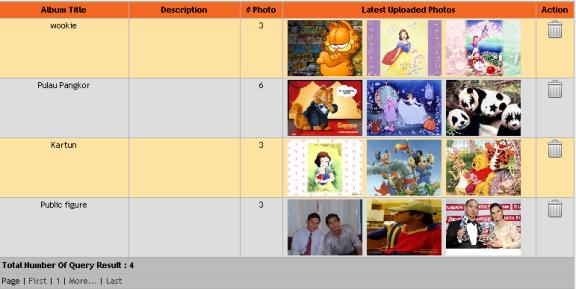
Figure
241: Delete Photo Form

Step
3
Click ‘dustbin’ icon at the
Action column for the Album you want to delete. You
will get details about the Album. See Figure 242.

Figure
242: Delete Album Details
Step
4
Click ‘Delete’ button and the
Photo Album will be removed.
Q25. How To Add Item Photo?
![]()
Figure
243: Officer Functional Menu – Cataloging
Step
1
Click Cataloging at
the Functional Menu as shown in Figure 243, and you shall get the below tab as
shown in Figure 244.

Figure
244: Photo Tab –Add Item Button
Step
2
Click Photo and ‘Add Item’ button that appear
under Cataloging Tab at Functional Menu as shown in Figure 244 and you
will see the form as shown in Figure 245.
![]()
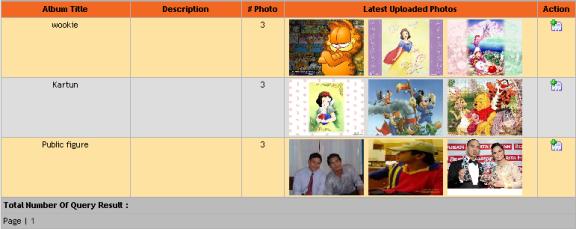
Figure
245: Add Item Photo Form

Step
3
Click ‘notebook’ icon at the Action column for the
Album you want to add. You
will get the Figure 246.
![]()
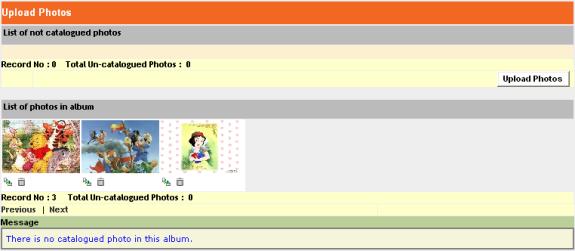
Figure
246: Add Item Album Details
Step
4
Click ‘Upload Photos’ button and
pop up upload photo will be appear as shown in
Figure 247.
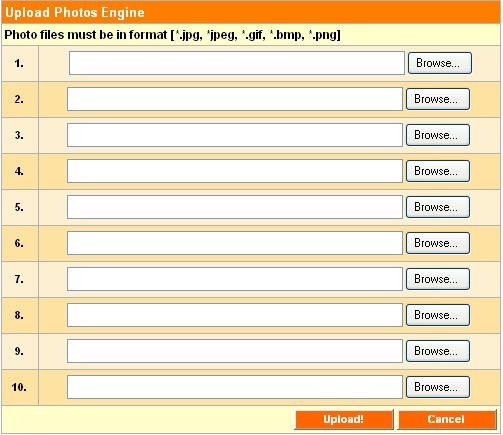
Figure
247: Pop Up Upload Photo
Step
5
Click ‘Browse’ to find a source
photo you want to add. See Figure 248.
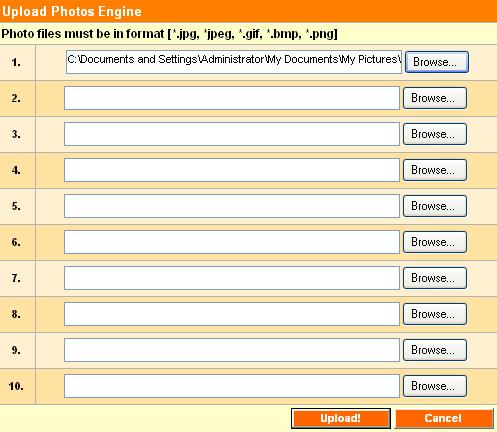
Figure
248: Filled Pop Up Upload Photo
Click ‘Upload’ button and
you can see the photo will be appear in the album list.
You can see in the Figure 249.
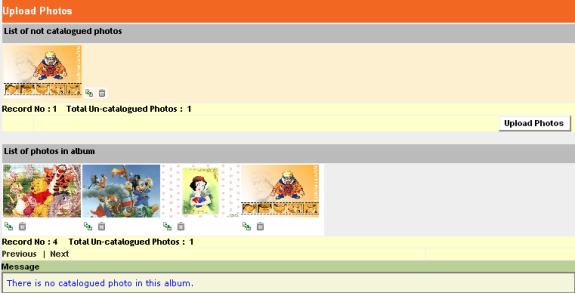
Figure
249: Photo Added Success
Q26. How To Delete Item
Photo?
![]()
Figure
250: Officer Functional Menu – Cataloging
Step
1
Click Cataloging at
the Functional Menu as shown in Figure 250, and you shall get the below tab as
shown in Figure 251.

Figure
251: Photo Tab –Delete Item Button
Step
2
Click Photo and ‘Delete Item’ button that
appear under Cataloging Tab at Functional Menu as shown in Figure 251
and you will see the form as shown in Figure 252.
![]()
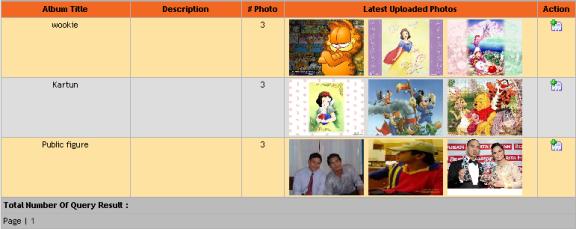
Figure
252: Delete Item Photo Form

Step
3
Click ‘notebook’ icon at the Action column for the
Album you want to delete. You will get the Figure 253.
![]()

Figure
253: Delete Item Album Details
Step
4
Click ‘small dustbin’ icon under
the photo you want to delete and photo details
will be appear as shown in Figure 254.
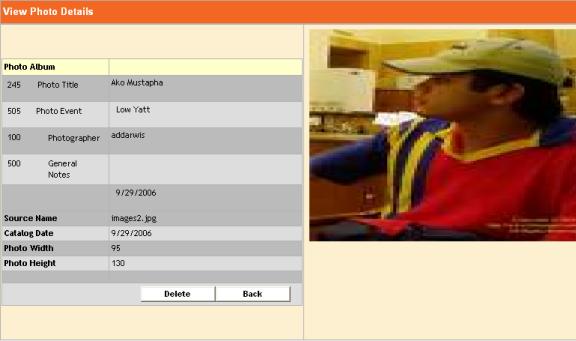
Figure
254: Delete Photo Details
Step
5
Click ‘Delete’ and the photo
will be removing from the album. See Figure 255.

Figure
255: Delete Item Success
Q27.
How To Update Detail Photo?
![]()
Figure
257: Officer Functional Menu – Cataloging
Step
1
Click Cataloging at
the Functional Menu as shown in Figure 257, and you shall get the below tab as
shown in Figure 258.

Figure
258: Photo Tab –Update Detail Button
Step
2
Click Photo and ‘Update Detail’ button that
appear under Cataloging Tab at Functional Menu as shown in Figure 258
and you will see the form as shown in Figure 259.
![]()

Figure
259: Update Detail Photo Form

Step
3
You can see at the column action has two icon. Click
icon at the left, you will get Upload Photo.
Please refer Q25 (How To Add
Item Photo?) and Q26 (How To Delete Item Photo?)
At the right icon, you will get
Update Album details. See Figure 260.
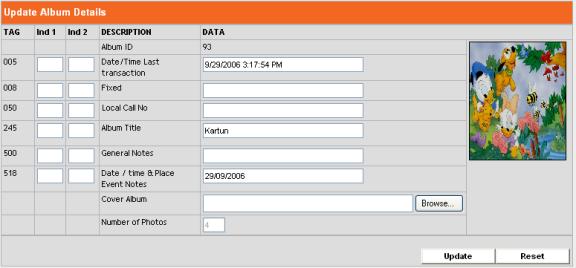
Figure
260: Update Album Details.
Type the word that you want to
change and click ‘Update’.

Figure
261: Update Album Details Success
Q28. How To Add Audio/Video?
![]()
Figure
262: Officer Functional Menu – Cataloging
Step
1
Click Cataloging at
the Functional Menu as shown in Figure 262, and you shall get the below tab as
shown in Figure 263.

Figure
263: Audio/Video Tab – Add
Step
2
Click Audio/Video and ‘Add’ button that
appear under Cataloging Tab at Functional Menu as shown in Figure 263
and you will see the form as shown in Figure 264.
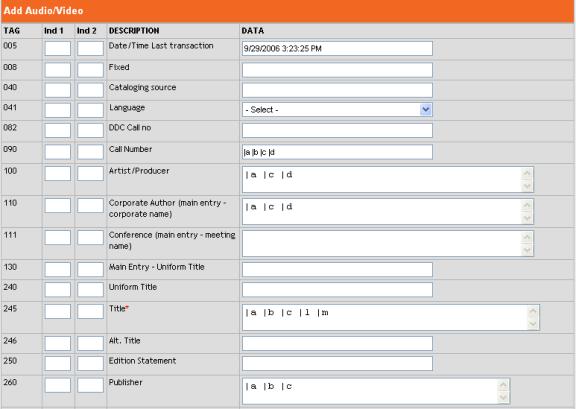


Figure
264: Audio/Video Form
You may type the value you want to add. You will get
the filled Audio/Video
from as shown in Figure 265.
![]()
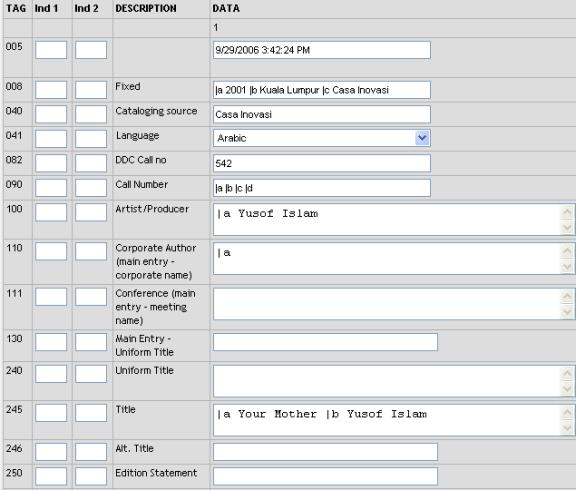

![]()
![]()
Figure
265: Filled Audio/Video Form
Please bear in
mind that the input shown above and the following ones are just examples.
You may type the values you want.

Step
3
Click ‘Add’ button and you will
get message success.
![]()
Q29. How To Delete Audio/Video?
![]()
Figure
266: Officer Functional Menu – Cataloging
Step
1
Click Cataloging at
the Functional Menu as shown in Figure 266, and you shall get the below tab as
shown in Figure 267.

Figure
267: Audio/Video Tab – Delete
Step
2
Click Audio/Video and ‘Delete’ button that
appear under Cataloging Tab at Functional Menu as shown in Figure 267
and you will see the form as shown in Figure 268.

Figure
268: Simple Search Audio/Video Form
Step
3
Search through simple search:
There are two methods to
used in simple search:
· Search
by List All A/V
· Search by Accession No., Artist, Call Number, Keyword,
Subject, and Title
Click ‘List All A/V’ if you want
to select from the list of all Audio/video in the
library.
Or, type in the Search for field and select
the criteria you want to search based on the words you typed. See Figure 269.

Figure
269: Filled Simple Search Audio/Video Form
Please bear in
mind that the input shown above and the following ones are just examples.
You may type the values you want.

Click ‘Search’ and you shall see Figure 270 shown if
the audio/video found.
![]()

Figure
270: Audio/Video Found
Click at the title as shown in
Figure 270. Figure 271 will be appearing.
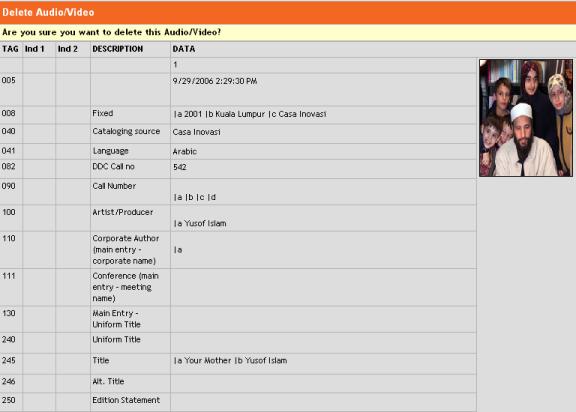
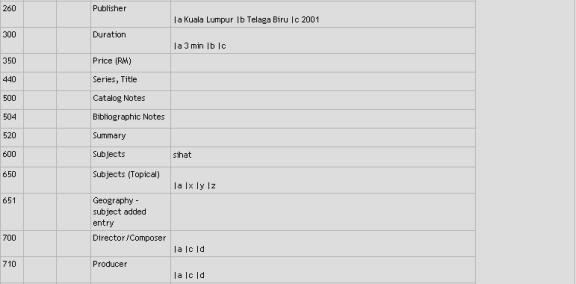

Figure
271: Audio/Video Details
Step
4
Click ‘Delete’ if you want to delete the audio/video
and you shall see the following message if the deletion succeeds.
![]()
Please
bear in mind that the audio/video can only be deleted if the status of all
items of the audio/video is Available.
Q30. How To Add New Audio/Video Item?
![]()
Figure
272: Officer Functional Menu – Cataloging
Step
1
Click Cataloging at
the Functional Menu as shown in Figure 272, and you shall get the below tab as
shown in Figure 273.

Figure
273: Audio/Video Tab – Add Item
Step
2
Click Audio/Video and ‘Add Item’ button that
appear under Cataloging Tab at Functional Menu as shown in Figure 273
and you will see the form as shown in Figure 274.

Figure
274: Simple Search Audio/Video Form
Step
3
Search through simple search:
There are two methods to
used in simple search:
· Search
by List All A/V
· Search by Accession No., Artist, Call Number, Keyword,
Subject, and Title
Click ‘List All A/V’ if you want
to select from the list of all Audio/video in the
library.
Or, type in the Search for field and select
the criteria you want to search based on the words you typed. See Figure 275.

Figure
275: Filled Simple Search Audio/Video Form
Please bear in
mind that the input shown above and the following ones are just examples.
You may type the values you want.

Click ‘Search’ and you shall see Figure 276 shown if
the audio/video found.
![]()
![]()
Figure
276: Audio/Video Found
Click at the title as shown in
Figure 276. Figure 277 will be appearing.

Figure
277: Add Audio/Video Item Form
As you can see (in this example), the audio/video is
titled Setanggi Syurga and the A/V ID is 4.
You can actually perform one
thing here:
· To
add the new item of the audio/video
You are advised to checkout the Item ID that you have
used to avoid adding the same Item ID to the new items.
Step
4
Click ‘Enter Item ID’ and you
shall see a window as Figure 278 pop ups.
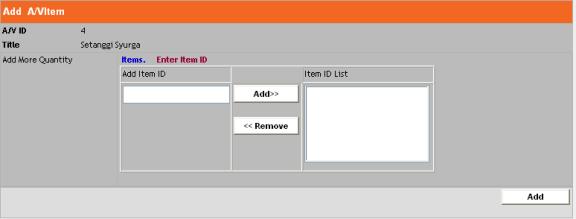
Figure
278: Add Audio/Video Item Sub-Form
Step
5
Type 3 Item Ids and add it to
the right list by clicking ‘Add’ as shown in Figure
279.
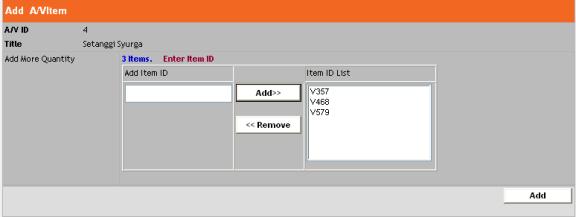
Figure 279: Add Book Item Sub-Form – Items Added
Step
8
Click ‘Add’ and the message
success will be shown.
![]()
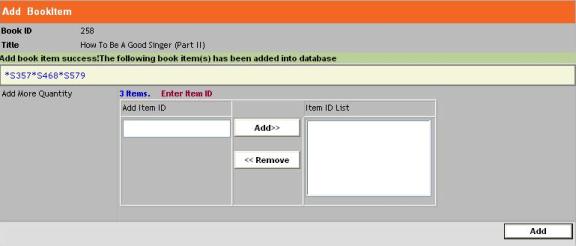
Figure
280: Add Book Item Sub-Form- Success
Step
9
Click ‘Add’ to add that 3 items
into the database.
Q31. How To Delete Audio/Video Item?
![]()
Figure
281: Officer Functional Menu – Cataloging
Step
1
Click Cataloging at
the Functional Menu as shown in Figure 281 and you shall get the below tab as
shown in Figure 282.

Figure
282: Audio/Video Tab – Delete Item
Step
2
Click Audio/Video and ‘Delete Item’ button
that appear under Cataloging Tab at Functional Menu as shown in Figure
283 and you will see the form as shown in Figure 284.

Figure
284: Simple Search Audio/Video Form
Step
3
Search through simple search:
There are two methods to
used in simple search:
· Search
by List All A/V
· Search by Accession No., Artist, Call Number, Keyword,
Subject, and Title
Click ‘List All A/V’ if you want
to select from the list of all Audio/video in the
library.
Or, type in the Search for field and select
the criteria you want to search based on the words you typed. See Figure 285.

Figure
285: Filled Simple Search Audio/Video Form
Please bear in
mind that the input shown above and the following ones are just examples.
You may type the values you want.

Click ‘Search’ and you shall see Figure 2865 shown
if the audio/video found.
![]()
![]()
Figure
286: Audio/Video Found
Click at the title as shown in
Figure 286. Figure 287 will be appearing.

Figure
287: Delete Audio/Video Item Form
Step 4
There
are two ways to delete Item:
· Delete Item(s) by
group
· Delete Item one by
one
Delete Item(s) by group
If you want to delete the
Audio/Video Item, click ‘Delete’ (black color font) that
appears at the Delete column and it will be deleted
from the list.
Delete Item one by one
Type the Item ID at the Textbox and click ‘Delete’ as shown in Figure
288. The
Audio/Video Item will
be removed.
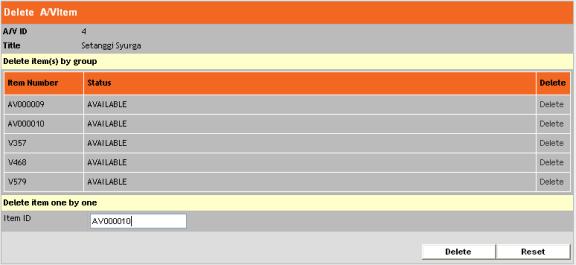
Figure
288: Delete Item Form – Delete by Typing Delete Item ID
Q32. How To Update Audio/Video Details?
![]()
Figure
289: Officer Functional Menu – Cataloging
Step
1
Click Cataloging at
the Functional Menu as shown in Figure 289, and you shall get the below tab as
shown in Figure 290.

Figure
290: Cataloging Tab –Update Detail
Step
2
Click Audio/Video and ‘Update Detail’ button
that appear under Cataloging Tab at Functional Menu as shown in Figure
290 and you will see the form as shown in Figure 291.

Figure
291: Simple Search Audio/Video Form
Step
3
Search through simple search:
There are two methods to
used in simple search:
· Search
by List All A/V
· Search by Accession No., Artist, Call Number, Keyword,
Subject, and Title
Click ‘List All A/V’ if you want
to select from the list of all audio/video in the
library.
Or, type in the Search for field and select
the criteria you want to search based on the words you typed. See Figure 292.

Figure
292: Filled Simple Search audio/video Form
Please bear in
mind that the input shown above and the following ones are just examples.
You may type the values you want.

Click
‘Search’ and you shall see Figure 293 shown if the book found.
![]()

Figure
293: Audio/Video Found
Click at the title as shown in Figure 293. Figure
294 will be appearing.
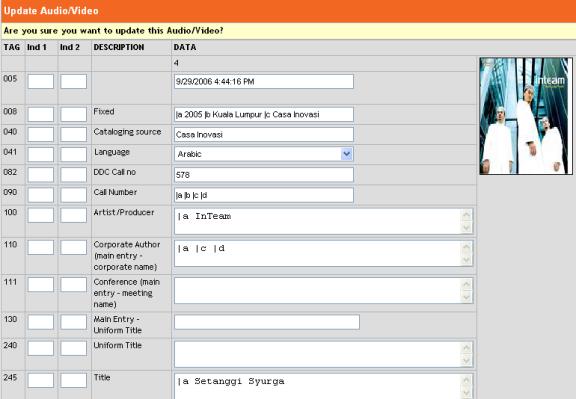
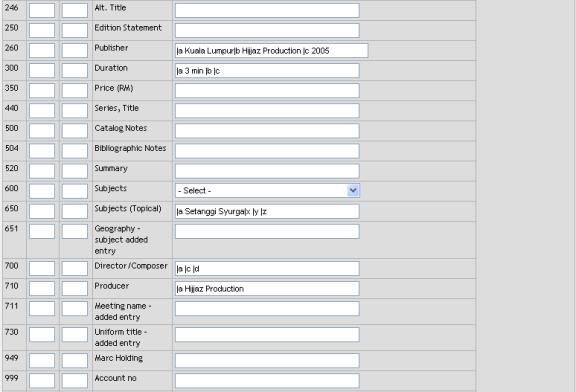

Figure
294: Audio/Video Details
Step
4
Type or edit whatever fields you
would like to update in this form.
Step
5
To confirm the change(s), click
‘Update’ and you shall get the following
successful message if the edition succeeds.

Q33. How to Add New Digital
Content?
![]()
Figure
295: Officer Functional Menu – Cataloging
Step
1
Click Cataloging at the Functional Menu as
shown in Figure 295.

Figure
296: Digital Content Tab –Add Item
Step
2
Click Digital Content and ‘Add Item’ button
that appear under Cataloging Tab at Functional Menu as shown in Figure
296 and you will see the form as shown in Figure 297.
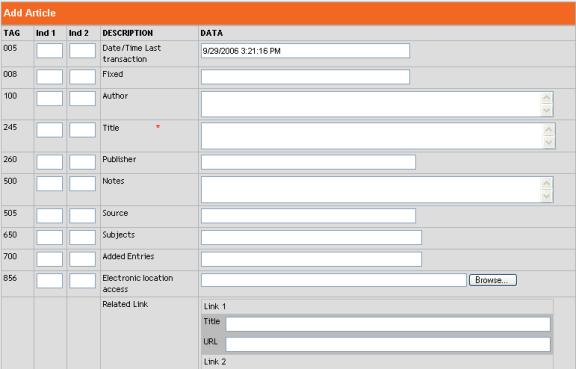
Figure 256: Add Digital Content Form
Step
3
Fill up the form as shown in the
figure 257.
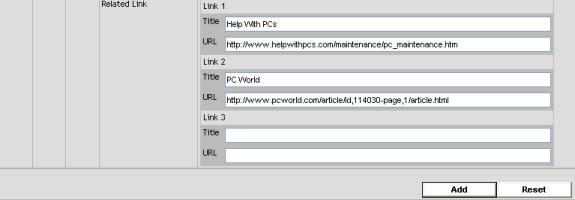
Figure 297: Form that have filled up.
Step
4
Click browse to upload the
digital content file. Refer to figure 258.
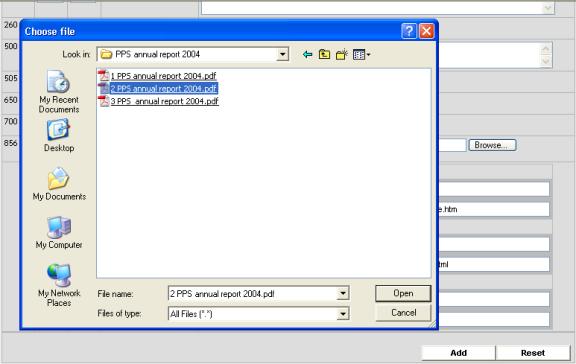
Figure
298: Upload Digital Content file.
Step
5
Click Add and this new Digital Content shall be
successfully added into database by returning the following message and
completed form

Q34. How to Delete Digital
Content?
![]()
Figure
299: Officer Functional Menu – Cataloging
Step
1
Click Cataloging at the Functional Menu as
shown in Figure 299.

Figure
300: Digital Content Tab –Delete
Step
2
Click Digital Content and ‘Add Item’ button
that appear under Cataloging Tab at Functional Menu as shown in Figure
300 and you will see the form as shown in Figure 301.
![]()
Figure 301: Search Article Form
There are 2 ways to get the article you want to
delete:
·
Search
by list all the articles
·
Search
by Author, Keyword, Subject and Title
Click ‘List All Articles’ if you want to select from
the list all articles in the database.
Or, type in the search for field and select the
criteria you want to search based on the words you typed.
If you choose ‘Search by List All The Articles’ just
click ‘List All Article’ button and you will get list of the articles in
database as shown in Figure 311.
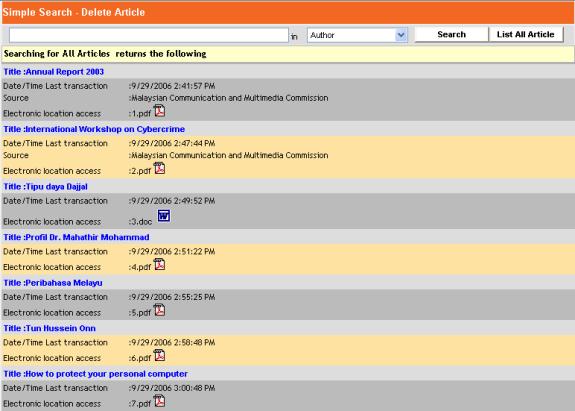
Figure 311: List of Articles
If you choose to type in the field search, just
simply type the word according to the criteria that you choose. Refer to Figure
264.

Figure 312: Search by type in field search
Then you will get result as in the Figure 265.

Figure 313: Result searching
article by type in field search.
Step
3
Click the Title in blue color and you will get the detail
of the article as shown in
Figure 314.
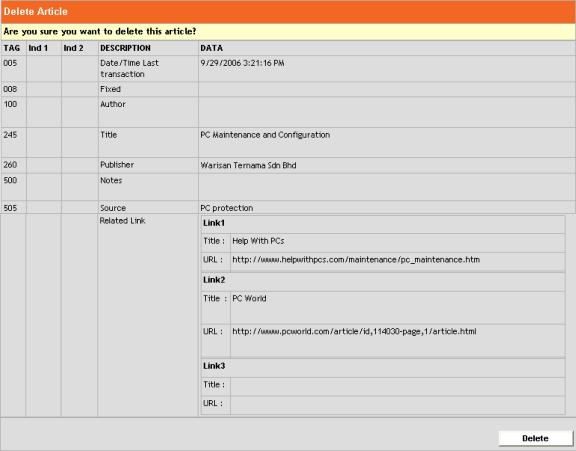
Figure 314: Details of the
chosen article.
Step 4
When you have confirmed that you want to delete
those article just click ‘Delete’.
Then the message that your article deleted
successfully. Refer to Figure 315.

Figure 315: Message ‘Delete
Article Success’.
Q35. How To Update Detail
Digital Content?
![]()
Figure
316: Officer Functional Menu – Cataloging
Step
1
Click Cataloging at
the Functional Menu as shown in Figure 316, and you shall get the below tab as
shown in Figure 317.

Figure
317: Digital Content Tab –Update Detail
Step
2
Click Digital Content and ‘Update Detail’
button that appear under Cataloging Tab at Functional Menu as shown in
Figure 317 and you will see the form as shown in Figure 318.
![]()
Figure 318: Search Article
form to Update Details
Step
3
Please follow the information for Figure 318 and you
will get details of the article in the form as shown in the Figure 319.
Step
4
Update the information that you want and click
‘Update’.
Then, the message that your update details article
is success will appear

Q36. How to Generate All
Patron Report?
![]()
Figure
319: Officer Functional Menu – Statistics
Step
1
Click Statistics at the Functional Menu as
shown in Figure 319.
![]()
Figure
320: Statistics Tab – User List
Step
2
Click User List that appear under Statistics
Tab at Functional Menu as shown in Figure 320 and you will see the form as
shown in Figure 321.
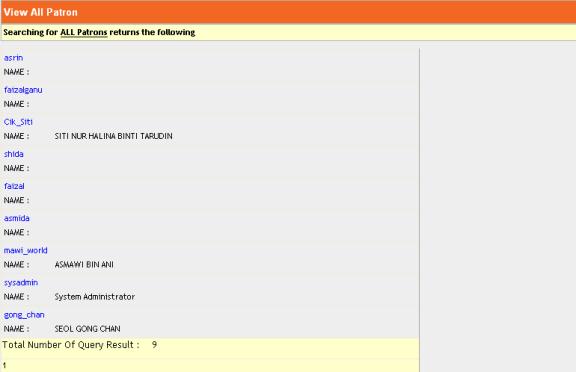
Figure
321: Patron List – All Patron

Step
3
Click on any Patron’s Username
to lead you to their details.
![]()
Figure
322: Officer Functional Menu – Statistics
Step
1
Click Statistics at the Functional Menu as
shown in Figure 322.
![]()
Figure
323: Statistics Tab – Report
Step
2
Click Report that appear under Statistics
Tab at Functional Menu as shown in Figure 323 and you will see the form as
shown in Figure 324.

Figure
324: Report Form
As
you can see, 2 types report can be generate here:
· Physical Collection
· Circulation
Physical Collection
Step
3
Choose ‘Physical Collection’ and
click ‘Choose’. You will get the Figure 325 as
shown below.
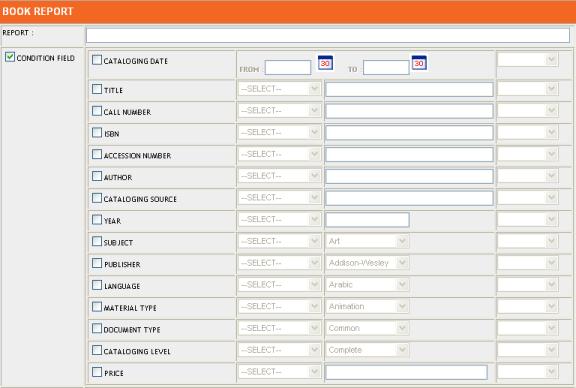
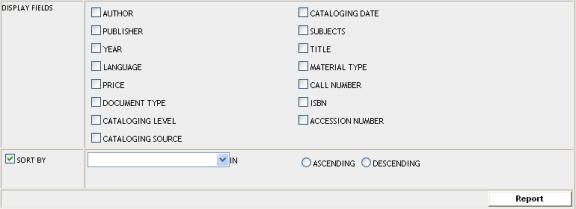
Figure
325: Report Form – Physical Collection
Type the word at ‘Report’ field and choose the
fields you want as shown in Figure
326.
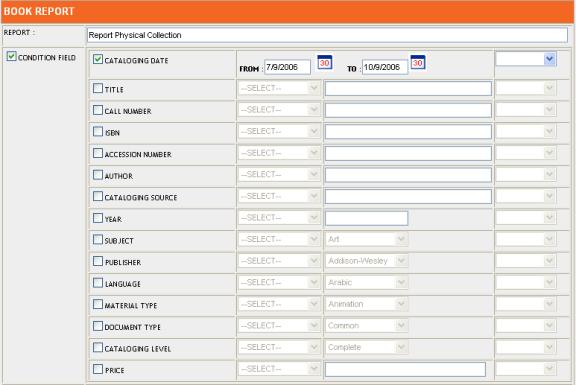
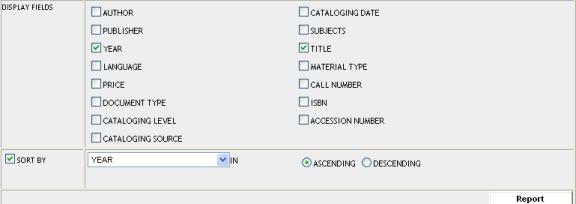
Figure
326: Filled Report Form – Physical Collection
Click ‘Report’ and Pop up will
be appearing as shown in Figure 327.

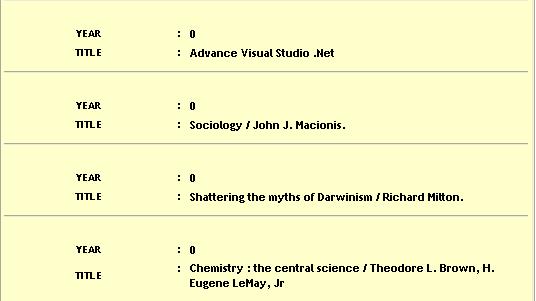
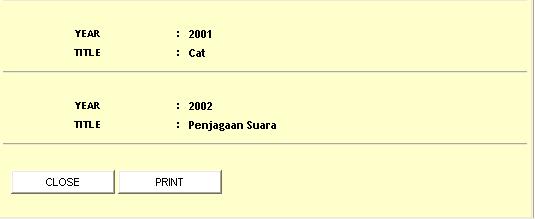
Figure
327: Pop up Report – Physical
Collection
Click ‘Print’ to get a hard copy
Click ‘Close’ to back a Physical Collection form.
Circulation
Step
4
Choose ‘Circulation’ and click
‘Choose’. You will get the Figure 328 as
shown below.
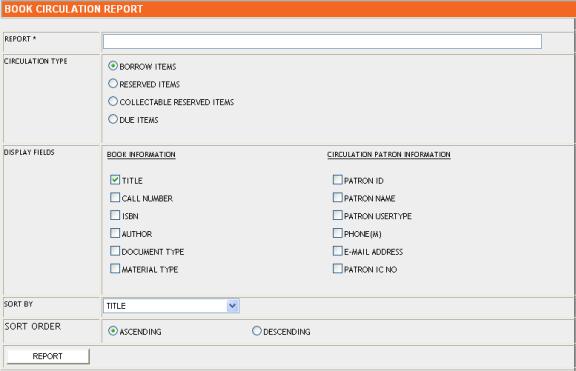
Figure
328: Report Form – Circulation
Type the word at ‘Report’ field and choose the
fields you want as shown in Figure
329.
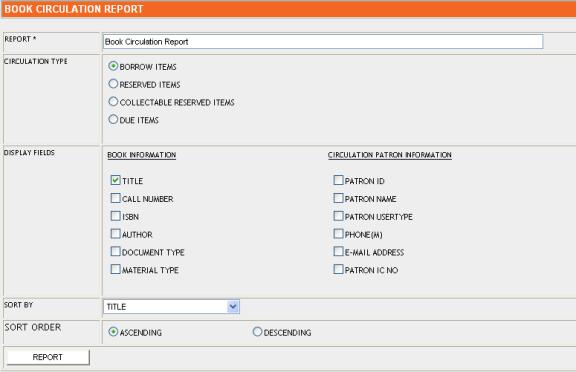
Figure
329: Filled Report Form - Circulation
Click ‘Report’ and Pop up will
be appearing as shown in Figure 327.
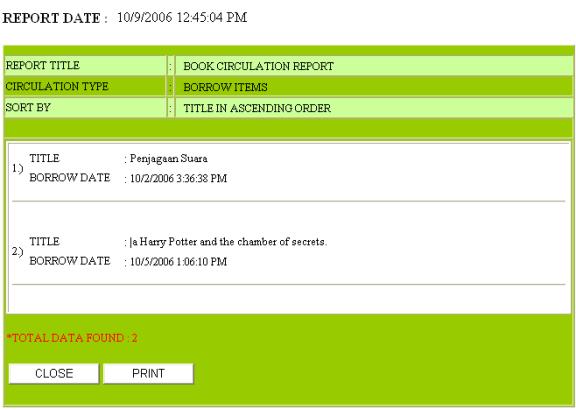
Figure
327: Pop up Report - Circulation
Click ‘Print’ to get a hard copy
Click ‘Close’ to back a Circulation form.
Q38. How to Generate
Statistics Report?
![]()
Figure
328: Officer Functional Menu – Statistics
Step
1
Click Statistics at the Functional Menu as
shown in Figure 328.
![]()
Figure
329: Statistics Tab – Statistics
Step
2
Click Statistics that appear under Statistics
Tab at Functional Menu as shown in Figure 329 and you will see the form as
shown in Figure 330.

Figure
330: Statistics Form
As
you can see, 2 types statistics report can be generate here:
· Circulation Statistics
· Book Statistics
Circulation Statistics
Step
3
Choose ‘Circulation Statistics’
and click ‘Choose’. You will get the Figure 331 as
shown below.
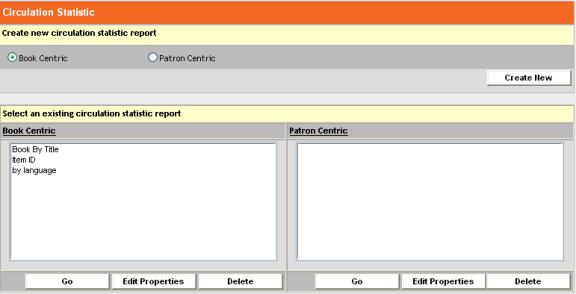
Figure
331: Statistics Report Form – Circulation Statistics
As you can see, in the Circulation Statistics Report
Form have 2 types:
· Book Centric
· Patron Centric
.
Book Centric
Click ‘Book Centric’ and
click ‘Create New’. See Figure 332.
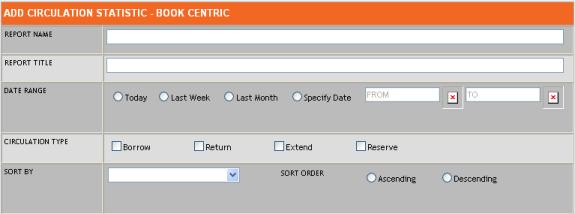
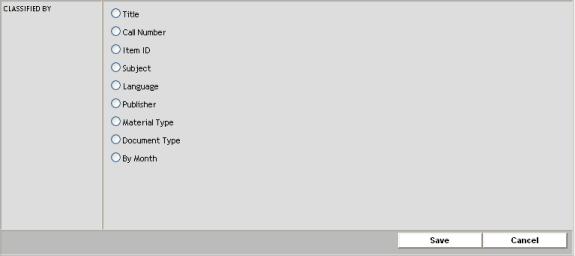
Figure
332: Circulation Statistics Form – Book Centric
Type the word at Report Name
and Report Title fields. Choose the fields you
want and you will see a Figure 333.
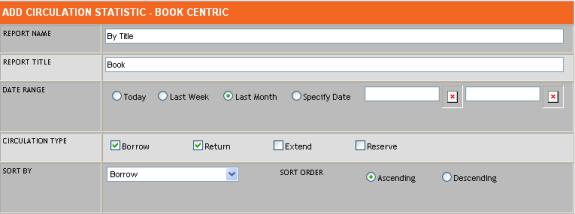
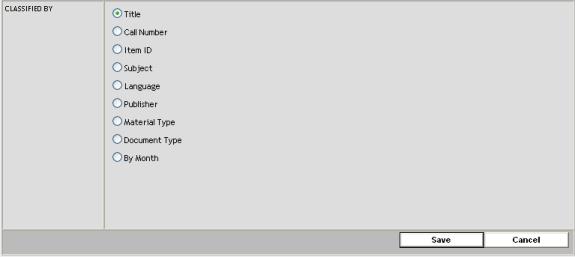
Figure
333: Filled Circulation Statistics – Book Centric
Click ‘Save’ and you will see
Figure 334. Otherwise click ‘Cancel’.
![]()

Figure
334: Report Screen
To View Report
Click at ‘Report Name’ and
click ‘Go’ button. Pop up report will be appears,
see Figure 335.
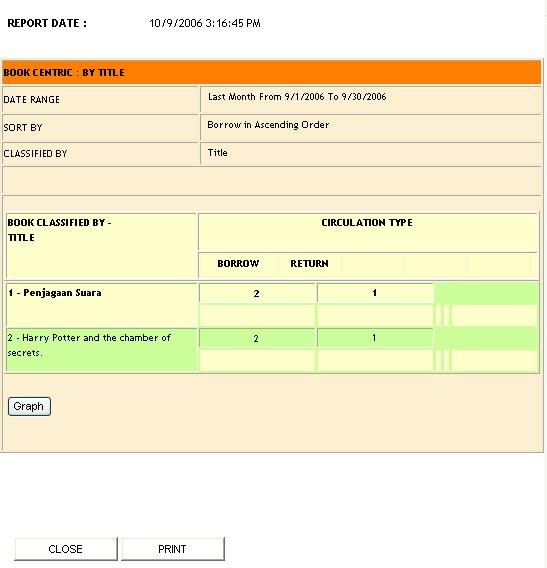
Figure
335: Pop up report – Book Centric
Click ‘Graph’, you can see a
data in graphic image. See Figure 336.
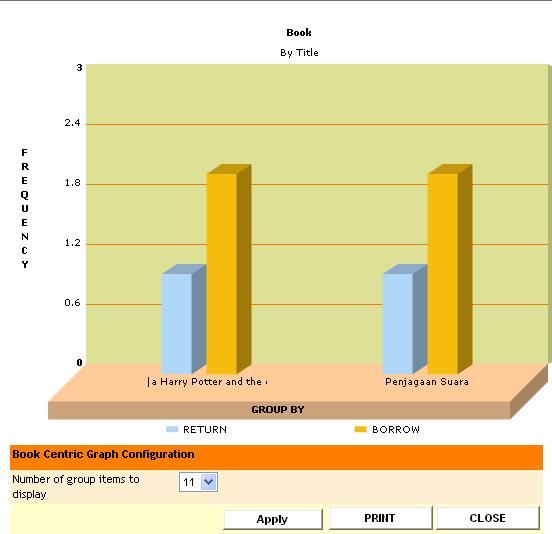
Figure
336: Graph Circulation Statistics – Book Centric
To Edit Report
Click ‘Report Name’ and click
‘Edit Properties’, you will get the Figure 337.
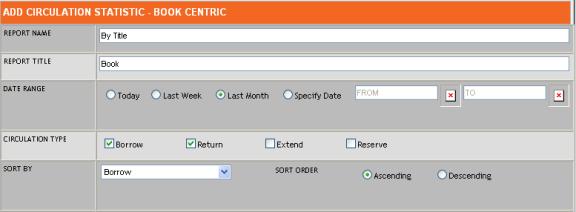
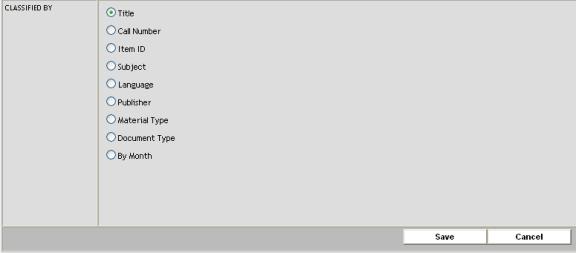
Figure
337: Circulation Statistics Form – Book Centric
Change the fields you want,
and click ‘Save’ button.
To Delete Report
Click ‘Report Name’ and
click ‘Delete’ button. Pop up message will be appears as
shown in Figure 338.
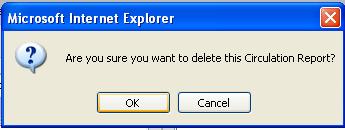
Figure
338: Pop up message
Click ‘Ok’ to delete Report Name
from the list.
Patron Centric
Refer Book Centric as a
reference.
Book Statistics
Refer Circulation Statistics
as a reference.
Q39. How To Customize Reserve (Inter Library Loan)?
Figure 339: Officer Functional Menu – Inter Library Loan
Step 1
Click Inter Library Loan at the Functional Menu as shown in Figure 339, and you shall get the below tab as shown in Figure 340.
Figure 340: Inter Library Loan Tab – Reserve
Step 2
Click Reserve that appear under Inter Library Loan Tab at Functional Menu as shown in Figure 340 and you will see Figure 341.

Figure 341: Reserve Search Form
Step 3
Select the reserve type (book or serial) the Patron wants to reserve, and type the Patron ID. See Figure 342.
Figure 342: Filled Search Patron Form
Please bear in mind that the input shown above and the following ones are just examples. You may type the values you want

Click ‘Go’ and you will see Figure 343.
Please take note that the Patron ID you type exists, and you shall see the following screen.

Figure 343: Reserve List
As you can see, (in this case), there are currently no book has been reserved (the list is empty).
And there are three actions that you can perform here.
· ‘Reserve’ – To reserve the library items (depends on which reserve type you click on the previous screen).
· ‘Complete’ – To end or cancel the patron session.
· ‘Switch To Serial’ – To allow patron switch to borrow book (depends on which reserve type you click on the previous screen. If Serial was selected previously, this button will appear to be ‘Switch To Book’).
Step 4
To reserve library items, type the Item ID in the textbox as shown in Figure 344. and click ‘Reserve’.

Figure 344: Reserve List – Reserve by Item ID
Step 5
Click ‘Reserve’ and you shall see the Item ID (in this case is Book Item ID) has been added to the table.


Figure 345: Reserve List – Item Reserved
To reserve more books, repeat Step 4.
To cancel the reserved books, click ‘Cancel’ that appear at the end of the table (under Reserve column).
To reserve Serial, click ‘Switch To Serial’.
To end or cancel the patron session, click ‘Complete’.
Q40. How To Customize Borrow (Inter Library Loan)?
Figure 346: Officer Functional Menu – Inter Library Loan
Step 1
Click Inter Library Loan at the Functional Menu as shown in Figure 346, and you shall get the below tab as shown in Figure 347.
Figure 347: Inter Library Loan Tab – Borrow
Click Borrow that appear under Inter Library Loan Tab at Functional Menu as shown in Figure 348 and you will see Figure 349.

Figure 348: Search Patron Form
Step 3
Select the borrow type (book or serial) the Patron wants to borrow, and type the Patron ID.

Figure 349: Filled Search Patron Form
Please bear in mind that the input shown above and the following ones are just examples. You may type the values you want.

Click ‘Go’ and you will see Figure 350.

Figure 351: Borrowed Item
As you can see, the borrowed library items will appear in the table (if any).
 |
Please bear in mind that the table shown above may differ from what you see based on the book(s) currently borrowed by the patron.
There are three actions that you can perform.
· ‘Complete’ – To end or cancel the patron session
· ‘Switch To Book’ – To allow patron switch to borrow book
(depends on which borrow type you have selected on the previous screen. If Book was selected previously, this button will appear to be ‘Switch To Serial’).
· ‘Borrow’ –To borrow book.
Step 4
Now that you are required to type the Book Item ID/Serial Item ID as Figure 352.

Figure 352: Borrow Item – Type Item ID
Step 6
Click ‘Borrow’ and the new borrowed book will appear in the table as shown in
Figure 353.

Figure 353: Borrow Item – Item Added
As you can see, the new borrowed book is showed in the table.
Repeat this step to borrow more library items.
If you want to cancel the borrowed book, click ‘Cancel’ (red color font) that
appears at the Status column and it will be deleted from the borrow list.
Q41. How To Customize Extend (Inter Library Loan)?
Figure 354: Officer Functional Menu – Inter Library Loan
Step 1
Click Inter Library Loan at the Functional Menu as shown in Figure 354, and you shall get the below tab as shown in Figure 355.
Figure 355: Inter Library Loan Tab – Extend
Click Extend that appear under Inter Library Loan Tab at Functional Menu as shown in Figure 355 and you will see Figure 356.

Figure 356: Search Patron ID Form
Step 3
Select the return type (book or serial) the Patron wants to return, and type the Patron ID. See Figure 357.

Figure 357: Filled Search Patron Form
Please bear in mind that the input shown above and the following ones are just examples. You may type the values you want

Click ‘Go’ and you will see Figure 358.
Please take note that the Patron ID you type exists, and you shall see the following screen.


Figure 358: Returned Book Items
As you can see, the list of the borrowed book is shown in the table in Figure 358.

Please bear in mind that the table shown above may differ from what you see based on the book(s) currently borrowed by the patron.
Step 4
To return library items, there are two ways to do sop:
· By clicking the ‘Return’ that appear at the return column of the table.
· By typing the Item ID (Book Item ID/Serial Item ID) at the textbox, and click ‘Return’.
Whichever way you use, it will be deleted from the borrow list.
To return other books, you can repeat Step 4.
Or to return serials, you can switch to serial by clicking ‘Switch To Serials’.
Or you can click ‘Complete’ to end or cancel the patron session.
Q1. How To View
Personal Account Activities?
![]()
Figure
359: Patron Role Menu
Step
1
Click My Account at
the Role Menu as shown in Figure 359, and you shall get the below tab as shown
in Figure 360.
![]()
Figure
360: Patron Sub Role Menu – My Activities
Step
2
Click My Activities at tab
as shown in Figure 361 and you shall get the below form as Shown in Figure 362.
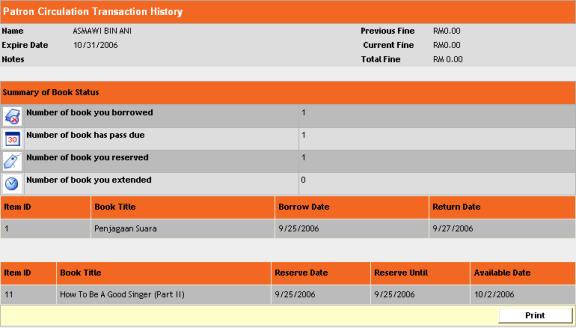
Figure
362: Patron Activities List

Q2. How To Extend Library Items?
![]()
Figure
363: Patron Functional Menu – Circulation
Step
1
Click Circulation at
the Functional Menu as shown in Figure 363, and you shall get the below tab as
shown in Figure 364.
![]()
Figure
364: Circulation Tab – Extend
Step
2
Click Extend that appear under Circulation
Tab at Functional Menu as shown in Figure 364 and you will see Figure 365.
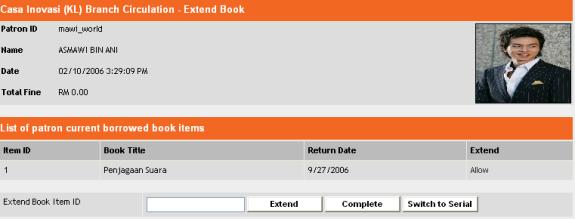
Figure
365: Extend Book Items Form


Please bear in
mind that the table shown above may differ from what you see based on the
book(s) currently borrowed by the patron.
Step
3
Click the ‘Allow’ that appears
at the last column of the table to extend Library
items.
Or you can type the Item ID at the textbox below the
table.
See Figure 366.
![]()
![]()
![]()
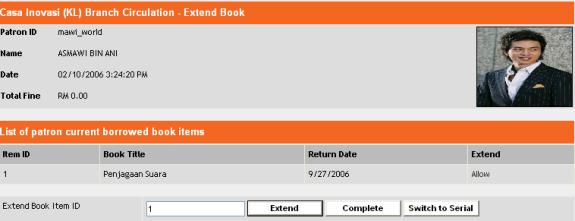
Figure
366: Filled Extend Book Items Form – Extend by Item ID
If
the extend is successful, you shall see the Return Date Changes. Or else you
will get the possible error message due to certain circulation rules or someone
has booked the book you are trying to extend.
Q3. How To Reserve
and Cancel Reservation of Book Items?
![]()
Figure
367: Patron Functional Menu – Circulation
Step
1
Click Circulation at
the Functional Menu as shown in Figure 367, and you shall get the below tab as
shown in Figure 368.
![]()
Figure
368: Circulation Tab – Reserve
Step
2
Click Reserve that appear under Circulation
Tab at Functional Menu as shown in Figure 368 and you will see Figure 369.
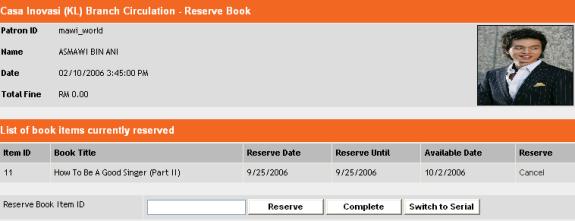
Figure
369: Reserved Book Items Form
As
you can see, there are ‘Cancel’ buttons that appear at the last column of the
table. And there is a
textbox after the table.
Please bear in
mind that the table shown above may differ from what you see based on the
book(s) currently borrowed by the patron.

Step 3
To
reserve book items, type in the Book Item ID as shown in Figure 370.

Figure
370: Filled Reserved Book Items Form – Reserve by Item ID
Step 4
Click
‘Reserve’ to confirm the reservation and you will see the Library items you
reserve appear in the
table if the reservation succeeds as shown in Figure 371.

Figure
371: Reserved Book Items Form – Added Item ID
If
you wish to cancel the reservation, click ‘Reserve’ and you will see the
Library
items being removed
from the table.
You
can switch to reserve Book or Serial (depends on which one you are
choosing currently)
to continue doing the reservation.
To end or cancel the
patron session, click ‘Complete’.
Q4. How To View Account History?
![]()
Figure
372: Patron Functional Menu – Circulation
Step
1
Click Circulation at
the Functional Menu as shown in Figure 372, and you shall get the below tab as
shown in Figure 373.
![]()
Figure
373: Circulation Tab – History
Step
2
Click History that appear under Circulation
Tab at Functional Menu as shown in Figure 373 and you will see Figure 374.
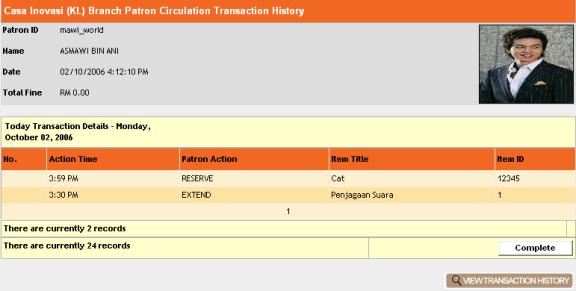
Figure
374: Today Transaction
As you can see, this is the list of Today
Transaction Details.

Step 3
To
view the transaction history, click ‘View Transaction History’ and you will see
Figure 375 shown.
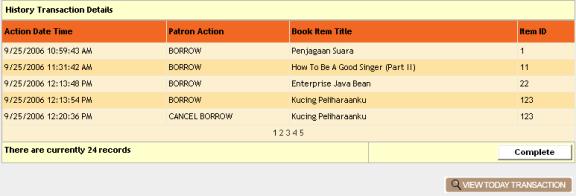
Figure
375: History Transaction

To
switch back to Today Transaction, click ‘View Today Transaction’.
Q1. How To Edit Personal Profile?
![]()
Figure
376: Patron Role Menu
Step
1
Click My Account at
the Role Menu as shown in Figure 376, and you shall get the below tab as shown
in Figure 377
![]()
Figure
377: Patron Sub Role Menu – My Activities
Step
2
Click My Profile at tab as
shown in Figure 377 and you shall get the below form as Shown in Figure 378.
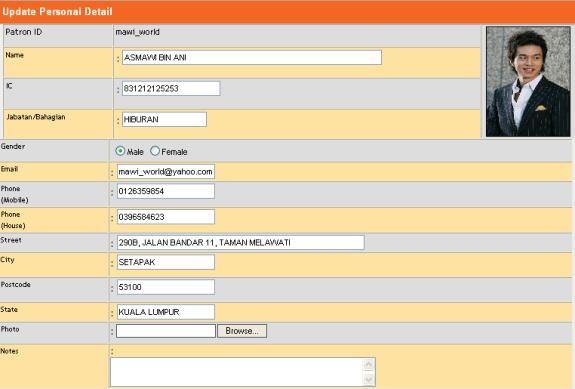
![]()
Figure
378: My Profile Form
Step
3
To edit any fields, just type in
your details at the respective fields and click
‘Update’.
Q2. How To Set The Search Preference?
![]()
Figure
379: Patron Role Menu
Step
1
Click My Account at
the Role Menu as shown in Figure 379, and you shall get the below tab as shown
in Figure
![]()
Figure
380: Patron Sub Role Menu – Search Preference
Step
2
Click Search Preference at
tab as shown in Figure 380 and you shall get the below form as Shown in Figure
381.
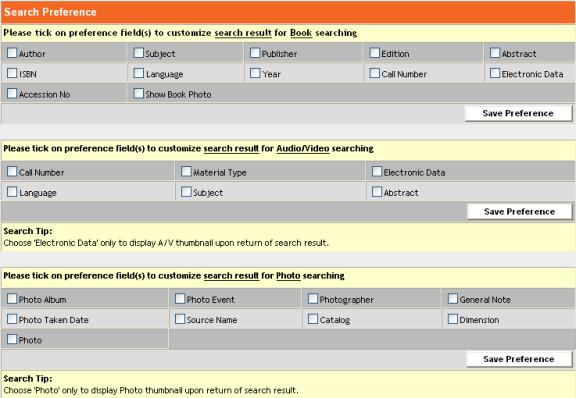

Figure
381: Search Preference Form
There
4 category with the criteria itself:
Book – Author, ISBN, Accession No., Subject,
Language, Show Book Photo,
Publisher, Year, Edition,
Call Number, Abstract, and Electronic Data.
Audio/Video - Material Type, Subject, Language, Call
Number, and
Electronic
Data.
Photo – Photo Album, Photo
Taken Date, Photo, Photo Event, Source Name,
Photographer, Catalog,
General Note, Dimension.
Article – Author, Subject,
Language, Abstract, Electronic Data, Keyword, Article
Date, related Link, General Note, and Related Periodical/Source.
Step
3
Check or Uncheck the criteria as
you want the category searched information to
appear.
Step
4
Click ‘Apply’ and you will see
the application successful message as in Figure
382.
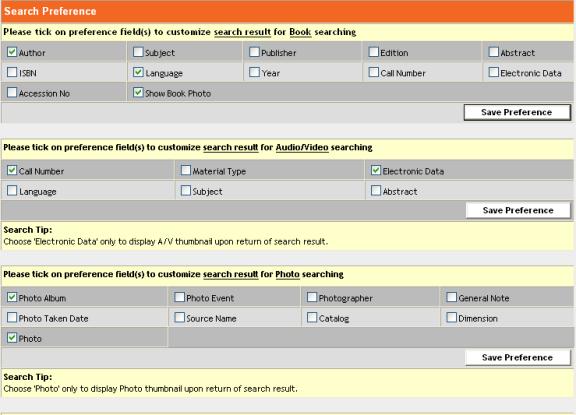

Figure
382: Edited Search Criteria Form
Q3. How To Change
Password?
![]()
Figure
383: Patron Role Menu
Step
1
Click My Account at
the Role Menu as shown in Figure 383, and you shall get the below tab as shown
in Figure 384.
![]()
Figure
384: Patron Sub Role Menu – Change Password
Step
2
Click Change Password at
tab as shown in Figure 384 and you shall get the below form as Shown in Figure
385.

Figure
385: Filled Change Password Form
Step
3
Type in your Old Password,
New Password, and Confirm Password.
Do not forget the length of the
new password is also between 6-20 characters.
Step
4
Click ‘Change’and the new
password will be updated.
Click ‘Reset’ if you want to
restore back to the previous data.
Q4. How To Search for Book Using OPAC (Simple Search)?
As
we have mentioned in Section 1.4.3, the search results of the OPAC search will
appear differently based on different Role even though OPAC is categorized as
the Common Features of the system. The purpose of the design is to cater for
the needs of the users of this system. Therefore, the following guide on how to
use OPAC search, you will see 2 variations of the search results appearance.
Administrator or
Officer

Figure
386: Administrator OPAC Tab – Simple Search

Figure
387: Administrator OPAC Tab – Simple Search
Step 1
Click
Simple that appear under OPAC Tab at Functional Menu as shown in
Figure 386 or Figure
387 and you will see Figure 388.
![]()

Figure
388: Simple Search Book Form
As
you can see, there is a Simple Search type of search that you perform in
Figure
388.
Step 2
Select
Physical Collection as the search type.
As you can see, there
are two ways to search for book(s).
· Search by List All
Book
· Search by Title,
Subject, Keyword, Call Number, Author, and
Accession
No.

Search by List All Book
Step 3
Click
‘List All Book’ and you shall see the list of books as shown in Figure 389.
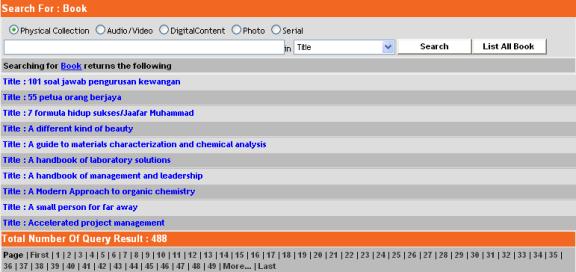
Figure
389: Book List – Search by List All Book

Proceed to Step 6
Search by Title, Subject, Keyword, Call Number,
Author, or Accession No.
Step 4
Type
in the word to search and select whether you search for Title, Subject,
Keyword, Call Number,
Author, or Accession No.
In
this example, Accession No. is the word to search for.

Figure 390: Simple Search Book Form – Search by
Accession No.
Step 5
Click
‘Search’ and if the record found, you shall see the searched book title
displayed as shown in
Figure 391.

Figure
391: Book List – Search by Accession No.
Step 6
Click
on the book to view the details, and you should see Figure 392 shown.

Figure
392: Book List
Step 7
Click
on the book to view the details, and you will get the Figure 393.
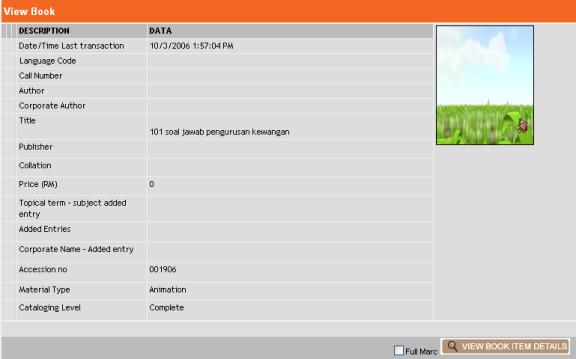
Figure
393: Book Details
As
you can see, there is a ‘View Book Item Details’ button appears at the bottom
right. To learn how
to view book item details, please refer to Q11 (How To View
Book Items Details?)
Patron or Public

Figure
394: Patron OPAC Tab – Simple Search

Figure
395: Public OPAC Tab – Simple Search
Step 1
Click
Simple that appear under OPAC Tab at Functional Menu as shown in
Figure 394 or Figure
395 and you will see Figure 396.
![]()

Figure
396: Simple Search Book Form
As
you can see, there is a Simple Search type of search that you perform in
Figure
376.
Step 2
Select
Physical Collection as the search type.
As you can see, there
are two ways to search for book(s).
· Search by List All
Book
· Search by Title,
Subject, Keyword, Call Number, Author, and
Accession
No.

Search by List All Book
Step 3
Click
‘List All Book’ and you shall see the list of books as shown in Figure 397.
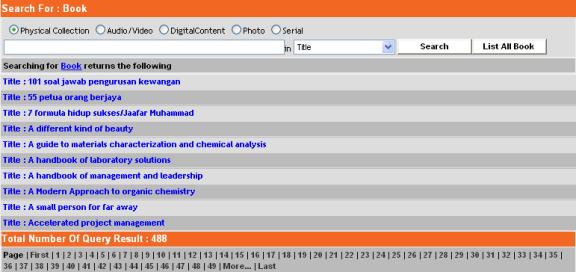
Figure
397: Book List – Search by List All Book

Proceed to Step 6
Search by Title, Subject, Keyword, Call Number,
Author, or Accession No.
Step 4
Type
in the word to search and select whether you search for Title, Subject,
Keyword, Call Number,
Author, or Accession No.
In
this example, Accession No. is the word to search for.

Figure 398: Simple Search Book Form – Search by
Accession No.
Step 5
Click
‘Search’ and if the record found, you shall see the searched book title
displayed as shown in
Figure 399.

Figure
399: Book List – Search by Accession No.
Step 6
Click
on the book to view the details, and you will get the Figure 400.
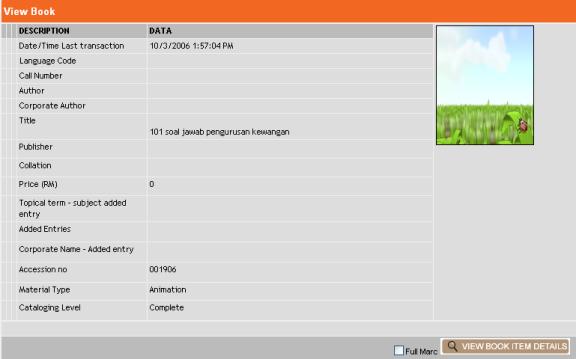
Figure
400: Book Details
As
you can see, there is a ‘View Book Item Details’ button appears at the bottom
right. To learn how
to view book item details, please refer to Q11 (How To View
Book Items Details?)
Q5. How To Search
for Audio/Video Using OPAC Search (Simple Search)?
As we have mentioned in Section 1.4.3, the
search results of the OPAC search will appear differently based on different
Role even though OPAC is categorized as the Common Features of the system. The
purpose of the design is to cater for the needs of the users of this system.
Therefore, the following guide on how to use OPAC search, you will see 2
variations of the search results appearance.
Administrator or
Officer

Figure
401: Administrator OPAC Tab – Simple Search

Figure
402: Administrator OPAC Tab – Simple Search
Step 1
Click
Simple that appear under OPAC Tab at Functional Menu as shown in
Figure 401 or Figure
402 and you will see Figure 403.
![]()

Figure
403: Simple Search Audio/Video Form
As
you can see, there is a Simple Search type of search that you perform in
Figure
403.
Step 2
Select
Audio/Video as the search type.
As you can see, there
are two ways to search for audio/video(s).
· Search by List All
Audio/Video
· Search by Title,
Subject, Keyword, Call Number, Artist, and
Accession
No.

Search by List All Audio/Video
Step 3
Click
‘List All A/V’ and you shall see the list of audio/videos as shown in Figure
404.
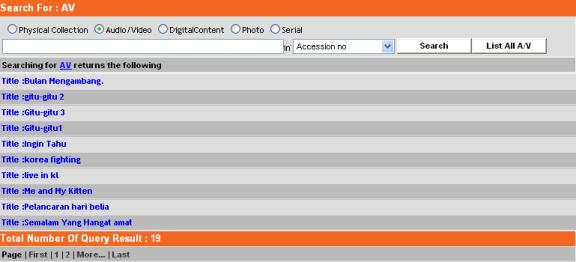
Figure
404: Audio/Video List – Search by List All Audio/Video

Proceed to Step 6
Search by Title, Subject, Keyword, Call Number,
Artist, or Accession No.
Step 4
Type
in the word to search and select whether you search for Title, Subject,
Keyword, Call Number,
Artist, or Accession No.
In
this example, Artist. is the word to search for.

Figure 405: Simple Search Audio/Video Form –
Search by Artist
Step 5
Click
‘Search’ and if the record found, you shall see the searched audio/video
artist displayed as
shown in Figure 386.
![]()
Figure
406: Audio/Video List – Search by Artist
Step 6
Click
on the audio/video title to view the details, and you should see Figure 407
shown.
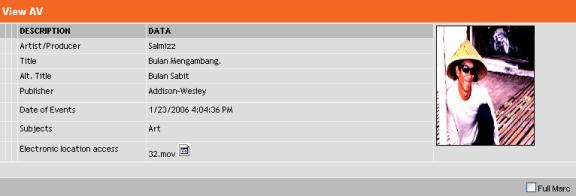
Figure
407: Audio/Video Details
Patron or Public

Figure
408: Patron OPAC Tab – Simple Search

Figure
409: Public OPAC Tab – Simple Search
Step 1
Click
Simple that appear under OPAC Tab at Functional Menu as shown in
Figure 408 or Figure
409 and you will see Figure 410.
![]()

Figure
410: Simple Search Audio/Video Form
As
you can see, there is a Simple Search type of search that you perform in
Figure
410.
Step 2
Select
Audio/Video as the search type.
As you can see, there
are two ways to search for audio/video(s).
· Search by List All
Audio/Video
· Search by Title,
Subject, Keyword, Call Number, Artist, and
Accession
No.

Search by List All Audio/Video
Step 3
Click
‘List All Audio/Video’ and you shall see the list of books as shown in
Figure 411.
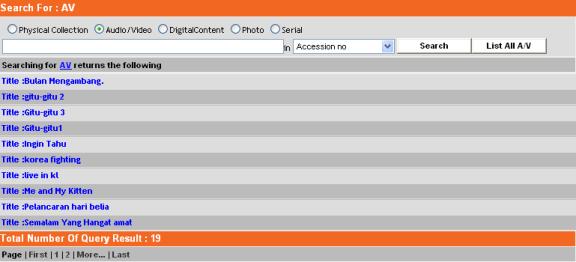
Figure
411: Audio/Video List – Search by List All Audio/Video

Proceed to Step 6
Search by Title, Subject, Keyword, Call Number,
Artist, or Accession No.
Step 4
Type
in the word to search and select whether you search for Title, Subject,
Keyword, Call Number,
Artist, or Accession No.
In
this example, Artist is the word to search for.

Figure 412: Simple Search Book Form – Search by
Artist
Step 5
Click
‘Search’ and if the record found, you shall see the searched audio/video
artist displayed as
shown in Figure 413.
![]()
Figure
413: Audio/Video List – Search by Artist
Step 6
Click
on the audio/video to view the details, and you will get the Figure 414.
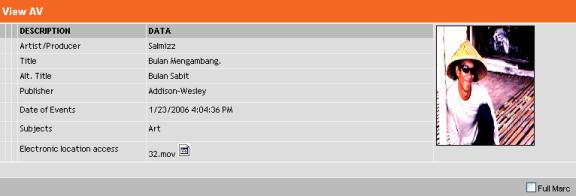
Figure
414: Audio/Video Details
Q6. How To Search
for Digital Content Using OPAC Search (Simple Search)?
As we have mentioned in Section 1.4.3, the
search results of the OPAC search will appear differently based on different
Role even though OPAC is categorized as the Common Features of the system. The
purpose of the design is to cater for the needs of the users of this system.
Therefore, the following guide on how to use OPAC search, you will see 2
variations of the search results appearance.
Administrator or
Officer

Figure
415: Administrator OPAC Tab – Simple Search

Figure
416: Officer OPAC Tab – Simple Search
Step 1
Click
Simple that appear under OPAC Tab at Functional Menu as shown in
Figure 415 or Figure
416 and you will see Figure 417.
![]()

Figure
417: Simple Search Digital Content Form
As
you can see, there is a Simple Search type of search that you perform in
Figure
417.
Step 2
Select
Article as the search type.
As you can see, there
are two ways to search for article(s).
· Search by List All
Article.
· Search by Title,
Subject, Keyword, and Author

Search by List All Article
Step 3
Click ‘List All
Article’ and you shall see the list of articles as shown in Figure 418.
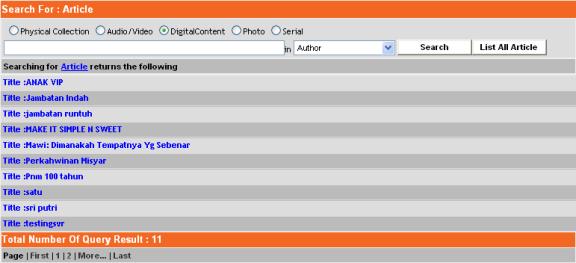
Figure
418: Article List – Search by List All Article

Proceed to Step 6
Search by Title, Subject, Keyword, and Author
Step 4
Type
in the word to search and select whether you search for Title, Subject,
Keyword, and Author.
In
this example, Author is the word to search for.

Figure 419: Simple Search Article Form – Search
by Author
Step 5
Click
‘Search’ and if the record found, you shall see the searched article title
displayed as shown in
Figure 420.
![]()
Figure
420: Article List – Search by Author
Step 6
Click
on the article to view the details, and you should see Figure 421 shown.

Figure
421: Article List
Step 7
Click
on the article to view the details, and you will get the Figure 422.

Figure
422: Article Details
Patron or Public

Figure
423: Patron OPAC Tab – Simple Search

Figure
424: Public OPAC Tab – Simple Search
Step 1
Click
Simple that appear under OPAC Tab at Functional Menu as shown in
Figure 423 or Figure
424 and you will see Figure 425.

Figure
425: Simple Search Digital Content Form
As
you can see, there is a Simple Search type of search that you perform in
Figure
425.
Step 2
Select
Article as the search type.
As you can see, there
are two ways to search for article(s).
· Search by List All
Article
· Search by Title,
Subject, Keyword, and Author

Search by List All Article
Step 3
Click ‘List All
Article’ and you shall see the list of articles as shown in Figure 426.
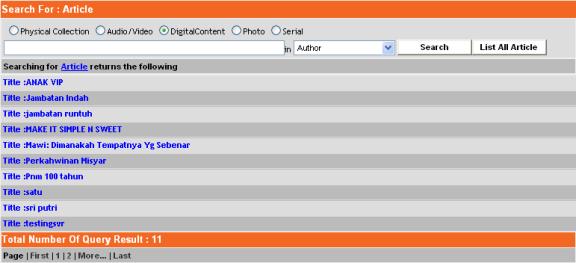
Figure
426: Article List – Search by List All Article

Proceed to Step 6
Search by Title, Subject, Keyword, and Author
Step 4
Type
in the word to search and select whether you search for Title, Subject,
Keyword, and Author.
In
this example, Author is the word to search for.

Figure 427: Simple Search Article Form – Search
by Author
Step 5
Click
‘Search’ and if the record found, you shall see the searched article title
displayed as shown in
Figure 428.
![]()
Figure
428: Article List – Search by Author
Step 6
Click
on the article to view the details, and you will get the Figure 429.

Figure
429: Article List
Step 7
Click
on the article to view the details, and you will get the Figure 430.

Figure
430: Article Details
Q7. How To Search
for Photo Using OPAC Search (Simple Search)?
As we have mentioned in Section 1.4.3, the
search results of the OPAC search will appear differently based on different
Role even though OPAC is categorized as the Common Features of the system. The
purpose of the design is to cater for the needs of the users of this system. Therefore,
the following guide on how to use OPAC search, you will see 2 variations of the
search results appearance.
Administrator or
Officer

Figure
431: Administrator OPAC Tab – Simple Search

Figure
432: Officer OPAC Tab – Simple Search
Step 1
Click
Simple that appear under OPAC Tab at Functional Menu as shown in
Figure 431 or Figure
432 and you will see Figure 433.
![]()

Figure
433: Simple Search Photo Form
As
you can see, there is a Simple Search type of search that you perform in
Figure
433.
Step 2
Select
Photo as the search type.
As you can see, there
are two ways to search for photo(s).
· Search by List All
Photo
· Search by Photographer, Photo
Title, Photo Event, Keyword, and
Album
Title.

Search by List All Photo
Step 3
Click
‘List All Photo’ and you shall see the list of photos as shown in Figure 434.

![]()
Figure
434: Photo List – Search by List All Photo

Proceed to Step 6
Search by Photographer, Photo Title, Photo
Event, Keyword, and Album Title.
Step 4
Type in the word to
search and select whether you search for Photographer, Photo Title, Photo
Event, Keyword, and Album Title.
In
this example, Photo Title is the word to search for.

Figure 435: Simple Search Photo Form – Search
by Photo Title
Step 5
Click
‘Search’ and if the record found, you shall see the searched photo title
displayed as shown in
Figure 436.

Figure
436: Photo List – Search by Photo Title
Step 6
Click
on the book to view the details, and you will get the Figure 437.
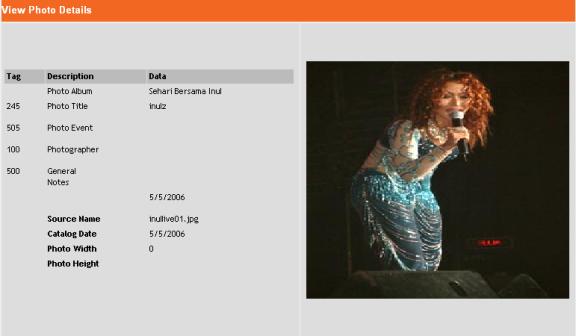
Figure
437: Photo Details
Patron or Public

Figure
438: Patron OPAC Tab – Simple Search

Figure
439: Public OPAC Tab – Simple Search
Step 1
Click
Simple that appear under OPAC Tab at Functional Menu as shown in
Figure 438 or Figure
439 and you will see Figure 440.

Figure
440: Simple Search Photo Form
As
you can see, there is a Simple Search type of search that you perform in
Figure
440.
Step 2
Select
Photo as the search type.
As you can see, there
are two ways to search for photo(s).
· Search by List All
Photo.
· Search by Photographer, Photo
Title, Photo Event, Keyword, and
Album
Title.

Search by List All Photo
Step 3
Click
‘List All Photo’ and you shall see the list of photos as shown in Figure 441.

![]()
Figure
441: Photo List – Search by List All Photo

Proceed to Step 6
Search by Photographer, Photo Title, Photo
Event, Keyword, and Album Title.
Step 4
Type in the word to
search and select whether you search for Photographer, Photo Title, Photo
Event, Keyword, and Album Title.
In
this example, Photo Title is the word to search for.

Figure 442: Simple Search Photo Form – Search
by Photo Title
Step 5
Click
‘Search’ and if the record found, you shall see the searched photo title
displayed as shown in
Figure 443.

Figure
443: Photo List – Search by Photo Title
Step 6
Click
on the book to view the details, and you will get the Figure 444.
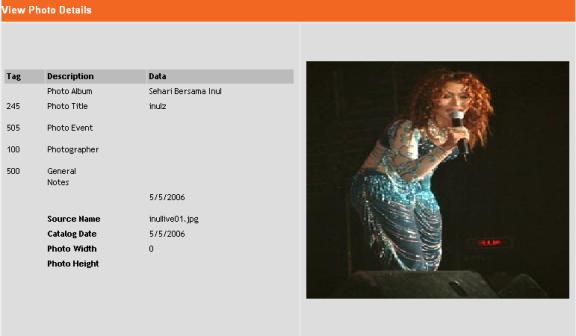
Figure
444: Photo Details
Q8. How To Search
for Serial Using OPAC Search (Simple Search)?
As we have mentioned in Section 1.4.3, the
search results of the OPAC search will appear differently based on different
Role even though OPAC is categorized as the Common Features of the system. The
purpose of the design is to cater for the needs of the users of this system.
Therefore, the following guide on how to use OPAC search, you will see 2
variations of the search results appearance.
Administrator or
Officer

Figure
445: Administrator OPAC Tab – Simple Search

Figure
446: Officer OPAC Tab – Simple Search
Step 1
Click
Simple that appear under OPAC Tab at Functional Menu as shown in
Figure 445 or Figure
446 and you will see Figure 447.
![]()

Figure
447: Simple Search Serial Form
As
you can see, there is a Simple Search type of search that you perform in
Figure
447.
Step 2
Select
Serial as the search type.
As you can see, there
are two ways to search for serial(s).
· Search by List All
Serial
· Search by Title, Subject, Keyword,
Item ID, ISSN, Call Number,
Accession
No.

Search by List All Serial
Step 3
Click
‘List All Serial’ and you shall see the list of serials as shown in Figure 448.
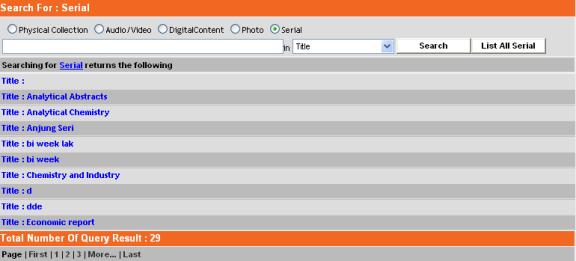
Figure
448: Serial List – Search by List All Serial

Proceed to Step 6
Search by Title, Subject, Keyword, Item ID,
ISSN, Call Number, Accession No.
Step 4
Type
in the word to search and select whether you search for Title, Subject,
Keyword, Item ID,
ISSN, Call Number, or Accession No.
In
this example, ISSN is the word to search for.

Figure 449: Simple Search Serial Form – Search
by ISSN
Step 5
Click
‘Search’ and if the record found, you shall see the searched serial title
displayed as shown in
Figure 450.

Figure
450: Serial List – Search by ISSN
Step 6
Click
on the book to view the details, and you will get the Figure 451.
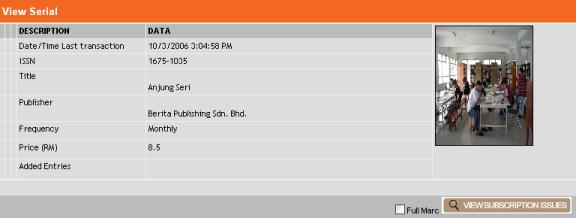
Figure
451: Serial Details
As
you can see, there is a ‘View Book Item Details’ button appears at the bottom
right. To learn how
to view book item details, please refer to Q11 (How To View
Serial Items
Details?)
Patron or Public

Figure
452: Patron OPAC Tab – Simple Search

Figure
453: Public OPAC Tab – Simple Search
Step 1
Click
Simple that appear under OPAC Tab at Functional Menu as shown in
Figure 452 or Figure
453 and you will see Figure 454.

Figure
454: Simple Search Serial Form
As
you can see, there is a Simple Search type of search that you perform in
Figure
454.
Step 2
Select
Serial as the search type.
As you can see, there
are two ways to search for serial(s).
· Search by List All
Serial
· Search by Title, Subject, Keyword,
Item ID, ISSN, Call Number,
Accession
No.

Search by List All Serial
Step 3
Click
‘List All Serial’ and you shall see the list of serials as shown in Figure 455.
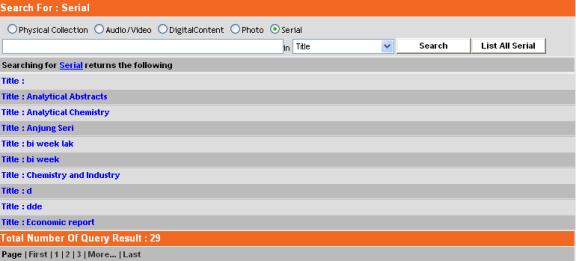
Figure
455: Serial List – Search by List All Serial

Proceed to Step 6
Search by Title, Subject, Keyword, Item ID,
ISSN, Call Number, Accession No.
Step 4
Type
in the word to search and select whether you search for Title, Subject,
Keyword, Item ID,
ISSN, Call Number, Accession No.
In
this example, ISSN is the word to search for.

Figure 456: Simple Search Book Form – Search by
Accession No.
Step 5
Click
‘Search’ and if the record found, you shall see the searched serial title
displayed as shown in
Figure 457.

Figure
457: Serial List – Search by ISSN
Step 6
Click
on the book to view the details, and you will get the Figure 458.
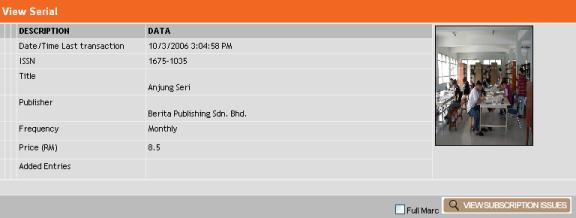
Figure
458: Serial Details
Step
7
Click ‘View Subscription Issues’
and the Figure 459 will be appearing
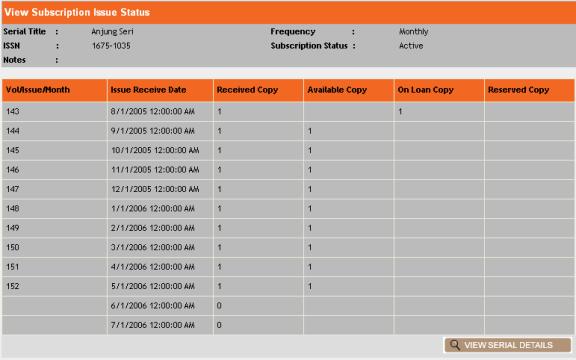
Figure
459: Serial Subscription Details
Q9. How To Search
Book Using OPAC Advanced Search?
In this Advanced Search, you will only be
showed on how to narrow down your search by precisely define or use the
combination of all fields to search for the desired books. There are methods
that used to combine the search and will be explain with examples. Not much
steps that required to be learned and followed but just to select the fields,
type the texts on the selected fields, and select the matching methods, then
click ‘Search’ to generate the search query.

Figure
460: Patron OPAC Tab – Advance Search
![]()
Figure
461: Public OPAC Tab – Advance Search
Step 1
Click
Advanced Search that appear under OPAC Tab at Functional Menu as
shown in Figure 460
or Figure 461 and you will see Figure 462.

Figure
462: Advance Search Type Form
Step
2
Select Book as the
Advance Search Type.
Step
3
Click ‘Go’, and you will see
Figure 463 shown.
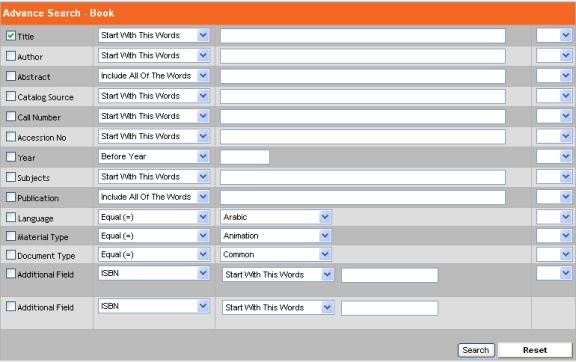
Figure
463: Advance Search Form
As you can see, there are up to 12 fields and 2
additional fields that let you define or narrow down your search to precisely
define the search. Advanced Search is
important when the database grows very huge.
Please take note that the default search field is
Title, which has been ticked for you.
To
understand how to use Advanced Search, lets see the
•
Match
Methods
that used to match the keywords you type with database.
•
Operators that used to perform the combination
of the fields you selected.
Match Method
For
Title, Author, Catalogue Source, Call Number, Accession No. and the last two
Additional Fields, the keyword you type will be matched with the database by
the following 4 ways:
Select this when you want the words or sentence
you typed matched at first word of the search sentence. For instance, if
you type How To at the Title field, the match result will be as follow: How
To Be A Good Singer How
To Be A Good Singer (Part II)
Start with the words

Include all of the words
Select this when you want the words or sentence you
typed matched at any part of the search sentence. For instance, if you type How
To at the Title field, the match result will be as follow:
How
To Be A Good Singer
How
To Be A Good Singer (Part II)
Include this exact phrase
Select this when you want the words or sentence you
typed matched exactly to the search sentence.
For instance, if you want to search for book with title How To Be A Good
Singer, you have to type exactly How To Be A Good Singer to achieve the
search result.
Exclude
these words
Select this when you want to inverse ‘Include any of
the words’ search method. In the other
words, for each of the words of the sentence you typed will not to be matched
with any part of the search sentence.
For instance, if you type How To Be at the Title field, the match
result will any book with title that not contains any of the word ‘How’ or ‘to’
or ‘be’.
For
the Year field , the following ways can be used to match to the desired result.

Before year
This is to search for any book that published before the indicated year.
Before
and Include year
This is same as method ‘Before year’ except the
indicated year is including in the matching.
In
year
This is the exact match of the year of the book
being published with the year you indicate.
After year
This is the search for any book that published after
the indicated year.
After
and Include year
This is sane as method ‘After year’ except the
indicated year is including in the matching.
For the Language, Material Type, and Document Type fields, the following ways can be used to match to the desired result. As you can notice, for each of these fields, there is a collection of input that can be selected from the dropdown textbox.

Equal (=)
This is the exact match of the selected input from the dropdown textbox to the database.
Not
Equal (<>)
This is the inverse search of ‘Equal (=)’. It will return results that do not contain
the selected input.
For the Abstract field, the following ways can be used to match to the desired result. As you can notice, for each of these fields, there is a collection of input that can be selected from the dropdown textbox.
Select this when you want the words or sentence
you typed matched at any part of the search sentence. For instance, if you
type How To at the Title field, the match result will be as follow: How To Be A Good Singer How
To Be A Good Singer (Part II)
Include all of the words

Include this exact phrase
Select this when you want the words or sentence you
typed matched exactly to the search sentence.
For instance, if you want to search for book with title How To Be A Good
Singer, you have to type exactly How To Be A Good Singer to achieve the
search result.
Exclude
these words
Select this when you want to inverse ‘Include any of
the words’ search method. In the other
words, for each of the words of the sentence you typed will not to be matched
with any part of the search sentence.
For instance, if you type How To Be at the Title field, the match
result will any book with title that not contains any of the word ‘How’ or ‘to’
or ‘be’.
For the Publication field, the following ways can be used to match to the desired result. As you can notice, for each of these fields, there is a collection of input that can be selected from the dropdown textbox.
Select this when you want the words or sentence
you typed matched at any part of the search sentence. For instance, if you
type How To at the Title field, the match result will be as follow: How To Be A Good Singer How
To Be A Good Singer (Part II)
Include all of the words

Equal
(=)
This
is the exact match of the selected input from the dropdown textbox to the
database.
Not
Equal (<>)
This is the inverse search of ‘Equal (=)’. It will return results that do not contain
the selected input.
Operator
Basically, there are only two operators used here: ‘And’ and ‘Or’.
These ‘And’ and ‘Or’ can be easily
interpreted as how we use it commonly.
‘And’ is used if you want the search to be precisely fit into each
and every criteria that you want.
For instance, to search for book using Advance Search, you want to
search for ‘Books that
were published in year 2001’ AND ‘the
language of the book is not English’ AND ‘the
material type is book’
![]()

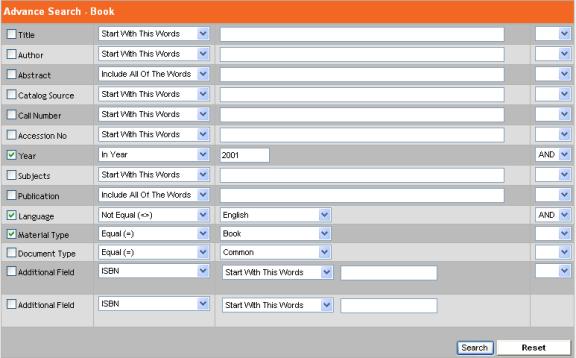
Figure
464: Filled Advanced Search Book Form
Step
4
Tick Year, select In year,
type 2001 in the textbox, and select And operator.
Step
5
Tick Language, select Not equal (<>),
select English, and select And operator
Step
6
Tick Material Type, select Equal (=), and
select Book.
Step
7
Click ‘Search’ and if any book(s) that match these
three search criteria, the list of books will be shown as in Figure 465.
Below is just an example figure of the matched
books.
Please take note that this is highly depends on the
books that you input into the database.
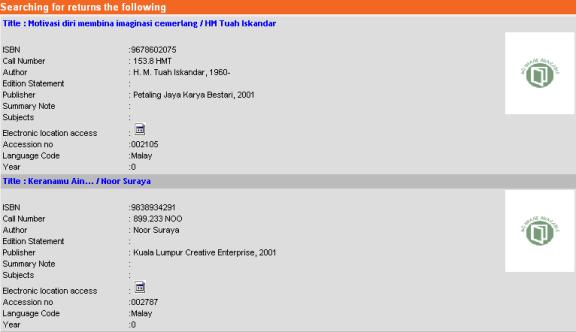

Figure
465: Book List – After Advanced Search

While if ‘Or’ operator is being used in the above example as:
‘Books that
were published in year 2001’ OR ‘the
language of the book is not English’ OR ‘the material
type is book’
By
repeating the above step 4 to 7 but remember to select Or operator
instead of And operator, and you will get a list of books that fulfill
any of the criteria stated above.
Figure 466 shows the search result.
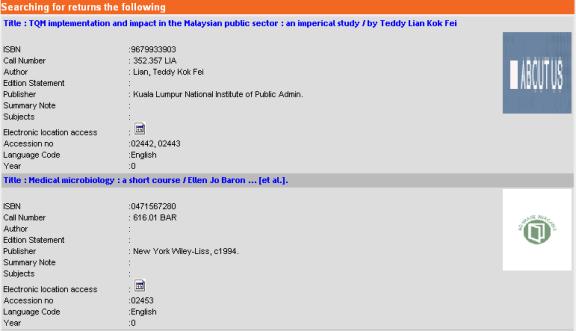
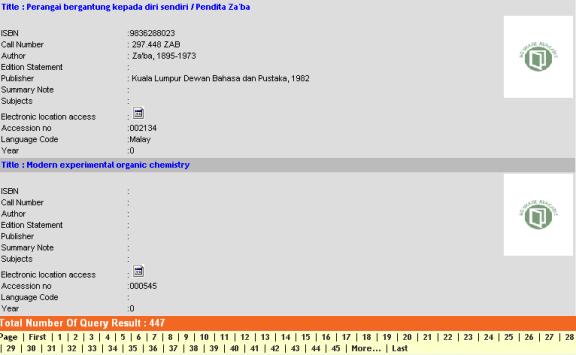
Figure 466: Book List – After
Advanced Search
As
you can see, the match is looser compared to ‘And’ operator, thus the matched
result probably appears to be more.
Please
bear in mind that the book list details shown above may differ from what
you see based on the Search Criteria you set previously as mentioned in Q2 (How To Set the Search Preference?)

To
view the book details, click on the book.
Please take note that the screen shows after clicking the book may
differ based on the Role as mention in Q4. (How To
Search Book Using OPAC Search)
Q10. How To Search Serial Using OPAC Advanced Search?
In this Advanced Search, you will only be showed on how to narrow down your search by precisely define or use the combination of all fields to search for the desired serials. There are methods that used to combine the search and will be explained with examples. Not much steps that required to be learned and followed but just to select the fields, type the texts on the selected fields, and select the matching methods, then click ‘Search’ to generate the search query.

Figure
467: Patron OPAC Tab – Simple Search
![]()
Figure
468: Public OPAC Tab – Advance Search
Step 1
Click
Advanced Search that appear under OPAC Tab at Functional Menu as
shown in Figure 467
or Figure 468 and you will see Figure 469.

Figure
469: Advance Search Type Form
Step
2
Select Serial as the
Advance Search Type.
Step
3
Click ‘Go’, and you will see
Figure 470 shown.
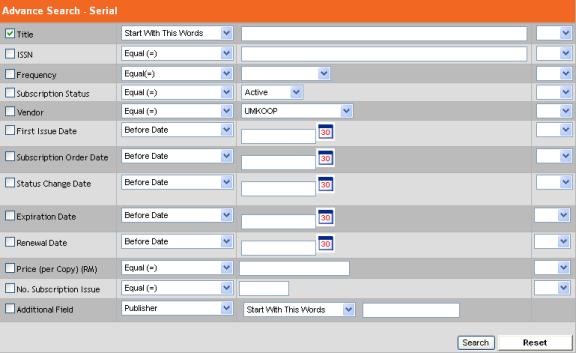
Figure
470: Advanced Search Serial Form
As you can see, there are there are 12 fields and 1
additional field that let you define or narrow down your search to precisely
define the search. Advanced Search is
important when the database grows very huge.
Please take note that the
default search field is Title, which has been ticked for you.
To
understand how to use Advanced Search, lets see the
•
Match
Methods
that used to match the keywords you type with database.
•
Operators that used to perform the
combination of the fields you selected
Match Method
For Title and the only
Additional Fields, the keyword you type will be matched with the database by
the following 4 ways:

Select this when you want the words or sentence you typed matched at first word of the search sentence. For instance, if you type Komik at the Title field, the match result will be as follow:
Komik Naruto
Include
all of the words
Select this when you want the words or sentence you
typed matched at any part of the search sentence. For instance, if you type Komik
at the Title field, the match result will be as follow:
Komik
Naruto
Include this exact phrase
Select this when you want the words or sentence you
typed matched exactly to the search sentence.
For instance, if you want to search for book with title Komik Naruto,
you have to type exactly Komik Naruto to achieve the search result.
Exclude
these words
Select this when you want to inverse ‘Include any of
the words’ search method. In the other
words, for each of the words of the sentence you typed will not to be matched
with any part of the search sentence.
For instance, if you type Komik at the Title field, the match
result will any book with title that not contains any of the word ‘Komik’.
For
the First Issue Date, Subscription Order Date, Status Change Date, Expiration
Date, and Renewal Date, the following ways can be used to match to the desired
result.
Before date This is to search for any serial that published
before the indicated date.

Before and Include date
This is same as method ‘Before date’ except the
indicated date is including in the matching.
In
date
This is the exact match of the date of the serial
being published with the date you indicate.
After
date
This is the search for any serial that published
after the indicated date.
After
and Include date
This is same as method ‘After date’ except the
indicated date is including in the matching.
For the ISSN, Frequency, Subscription Status, and Vendor, the following ways can be used to match to the desired result. As you can notice, for each of these fields, there is a collection of input that can be selected from the dropdown textbox.
Equal (=) This is the exact match of the selected input
from the dropdown textbox to the database.

Not
Equal (<>)
This is
the inverse search of ‘Equal (=)’. It
will return results that do not contain
the selected input.
Operator
Basically, there are only two operators used here: ‘And’ and ‘Or’.
These ‘And’ and ‘Or’ can be easily
interpreted as how we use it commonly.
‘And’ is used if you want the search to be precisely fit into each
and every criteria that you want.
For instance, to search for serial using Advance Search, you want to
search for ‘Serials
that the title not having word Hai’ AND ‘the
frequency of the book is Monthly’ AND ‘the status
change date is before 1st Feb 2004’

![]()
You
should perform the following steps as shown in Figure 471:
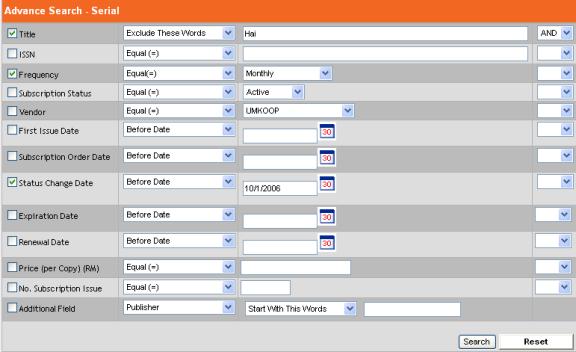
Figure
471: Filled Advanced Search Serial Form
Step
4
Tick Title, select Exclude
these words, type Hai in the textbox, and select And
operator.
Step
5
Tick Frequency, select Equal (=), select Monthly,
and select And operator
Step
6
Tick Status Change Date, select Before Date,
select 1 (day), 2 (month), 2004 (year), and select And operator
Step
7
Click ‘Search’ and if any serials(s) that match
these three search criteria, the list of books will be shown as in Figure
454.
Below is just an example figure of the matched
serials.
Please take note that this is highly depends on the
serials that you input into the database.
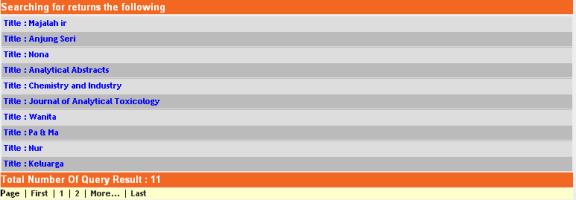
Figure
472: Serial List – After Advanced Search
While if ‘Or’ operator is being used in the above example as:
‘Serials that the title not having word Hai’ OR ‘the frequency of the book is Monthly’ OR ‘the status change date
is before 1st Feb 2004’
By
repeating the above step 4 to 7 but remember to select Or operator
instead of And operator, and you will get a list of books that fulfill
any of the criteria stated above.
Figure 472 shows the search result.
Q11. How To Customize Order - Administrator?
![]()
Figure
473: Administrator Functional Menu – Acquisition
Step
1
Click Acquisition at
the Functional Menu as shown in Figure 473, and you shall get the below tab as
shown in Figure 474.
![]()
Figure
474: Acquisition Tab – Order
Step
2
Click Order that appear under Acquisition
Tab at Functional Menu as shown in Figure 474 and you will see Figure 475.
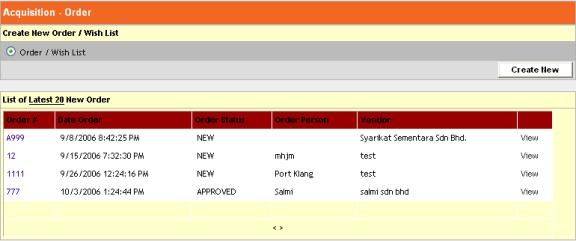
Figure
475: Acquisition Form - Order
Step
3
Click ‘Create New’ to make a new
order. See Figure 476.
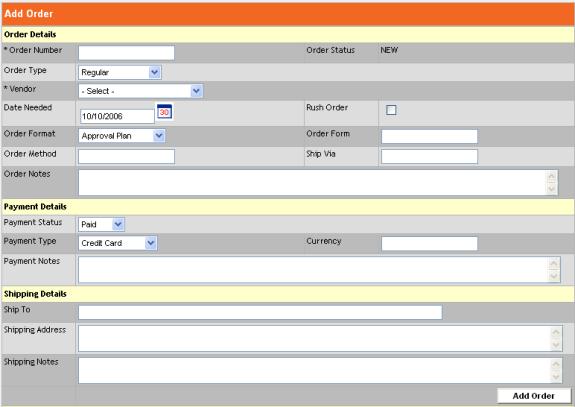
Figure
476: Order Form
Step 4
Type
(at least) the required fields (*-marked), as shown in Figure 477.
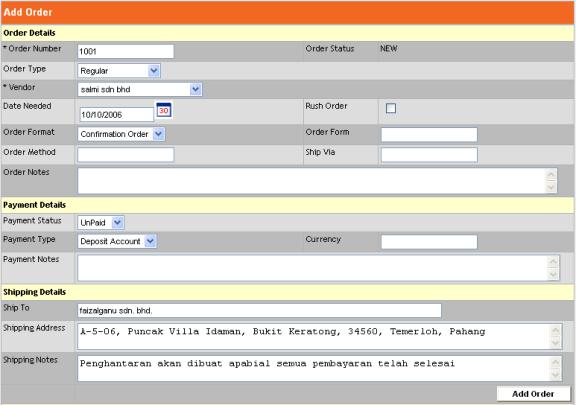
Figure
477: Filled Order Form


Step 5
Click
‘Add Order’, you will get the successful message if the addition is
successful as shown
below.
![]()
At the same screen successful message, the figure
460 will be appearing as shown.

Figure
478: Order Form – Add Item
Type the word in the fields and
you will get the Figure 479.

Figure
479: Filled Order Form – Add Item
Click ‘Add Item’ and you will
see Figure 480.

Figure
480: Order Form – Add Item List
Q12. How To Configure Budget Control?
![]()
Figure
481: Administrator Functional Menu – Acquisition
Step
1
Click Acquisition at
the Functional Menu as shown in Figure 481, and you shall get the below tab as
shown in Figure 482.
![]()
Figure
482: Acquisition Tab – Budget Control
Step
2
Click Budget Control that appear under Acquisition
Tab at Functional Menu as shown in Figure 482 and you will see Figure 483.
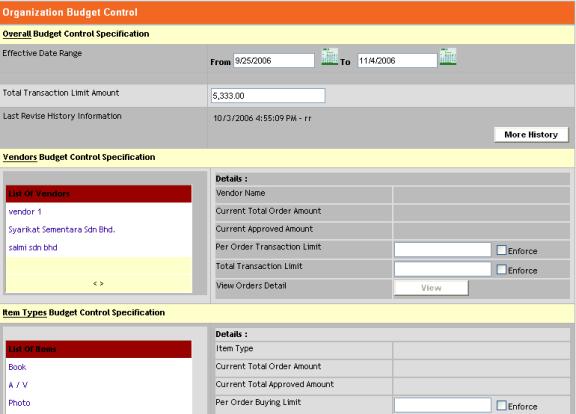

Figure
483: Budget Control Form
Step 3
For the Overall
Control Budget Specification, choose the date effective date range, type
the number at the Total Transaction Limit Amount and the the Last Revise
History Information already set from the last action.
Please bear in mind that the inputs shown above are just
examples. You may type the values you want.

Click ‘More History’ to review
the latest revise date list. See Figure 484.
![]()
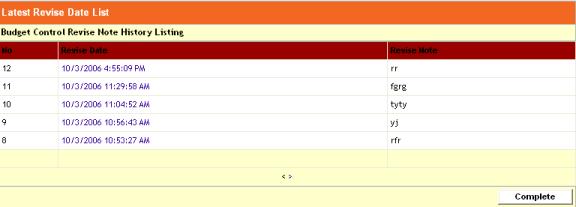
Figure 484: Revise Date List
History
To view the item details, click on the date. You will see Figure 485.

Figure
485: Budget Control Report
Step
4
For the Vendors Budget Control Specification, click
at the list of vendors, and all the details will be appear at the right side.

Figure
486: Vendors Budget Control Form
Click View and pop up list by
vendor will be appearing. See Figure 487.
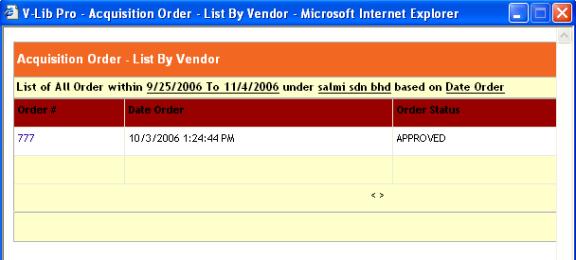
Figure
487: Pop up message
Step
5
For Item Types Budget Control Specification, click
at the list of items and the details will be appearing at the right side.

Figure
488: Item Types Budget Control Form
Click View and pop up list by
vendor will be appearing. See Figure 489.
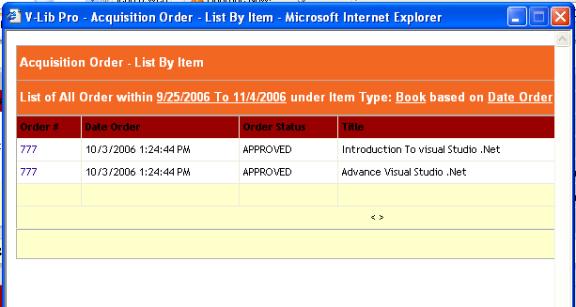
Figure
489: Pop up message

Figure 490: Revise Note Form
Click ‘Save’ button.
Q13. How To Customize Order - Officer?
![]()
Figure
491: Officer Functional Menu – Acquisition
Step
1
Click Acquisition at
the Functional Menu as shown in Figure 491, and you shall get the below tab as
shown in Figure 492.
![]()
Figure
492 Acquisition Tab – Receiving
Step
2
Click Receiving that appear under Acquisition
Tab at Functional Menu
Q14 How To Customize Update Cataloging?
![]()
Figure
493:fficer Functional Menu – Acquisition
Step
1
Click Acquisition at
the Functional Menu as shown in Figure 493 and you shall get the below tab as
shown in Figure 494
![]()
Figure
494Acquisition Tab – Update Cataloging
Step
2
Click Update Cataloging that appear under Acquisition
Tab at Functional Menu as shown in Figure 494 and you will see Figure 495.

Figure
495: Update Cataloging Form
There are 2 methods to move a book order to
cataloging.
· By
Select All
· One
By One
By
Select All
Click ‘Select All’ button,
that’s mean all the list will be checked in the boxes.
One By One
Tick the box at the list
book do you want to move.
Step
3
After you choose either one the
method above, click ‘Move’ and automatically
the book move to cataloging.
Click ‘Deselect All’ to uncheck all the boxes.
![]()
Figure
496: Officer Functional Menu – Acquisition
Step
1
Click Acquisition at
the Functional Menu as shown in Figure 496, and you shall get the below tab as
shown in Figure 497.
![]()
Figure
497: Acquisition Tab – Claim
Step
2
Click Claim that appear under Acquisition
Tab at Functional Menu as shown in Figure 497 and you will see Figure 498.

Figure
498: Claim List – Unreceived/Incomplete
Click ‘Claim’ Link at the
right side, and you will get Figure 499.
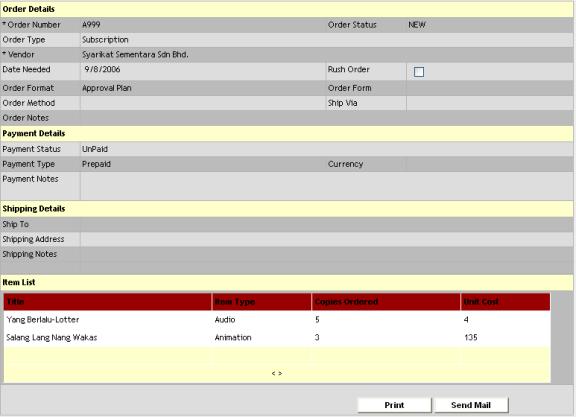
Figure
499: Order Details Form
Click ‘Print’ to get a hard
copy
Click ‘Send Email’ to make a
person alert.
PART THREE: QUICK
INDEXES
Administrator
Q1.
How To Signup new System Administrative User?
Q2.
How To Find For an Administrator or an Officer Profile?
Q3.
How To Edit and Delete Administrator Profile?
Q4.
How To Configure User Type for Admin, Officer and Patron?
Q5.
How To Configure The Cataloging Fields Option?
Q6.
How To Configure Circulation Rules and Regulations?
Q7.
How To Configure Web Link Group?
Q8.
How To Customize Contact Info?
Q9.
How To Configure Email Setup?
Q10.
How To Customize Main Page?
Q11.
How To Configure Tag Setup?
Q12.
How To Configure User Access?
Q15.
How To Update New Vendor?
Q17.
How To View For Vendor Profile?
Officer
Q2.
How To Update Patron’s Profile?
Q3.
How To Edit Patron’s Photo?
Q5.
How To Search Patron’s Profile?
Q6.
How To View A Patron’s Current Activities?
Q7.
How To Check If A Patron Has Been Fined?
Q8.
How To Allow Patron To Borrow Library Item?
Q9.
How To Return Library Items From Patron?
Q10.
How To Extend Library Items For Patron?
Q11.
How To Reserve Library Items For Patron?
Q12.
How To View The Account Transaction History Of Patron?
Q15.
How To Add New Book Item?
Q17.
How To Update Book Details?
Q18.
How To Edit Book’s Photo?
Q21.
How To Update Serial Details?
Q22.
How To Check-In Issues of Serials?
Q23.
How To Add New Photo Album ?
Q24.
How To Delete Photo Album?
Q26.
How To Delete Item Photo?
Q27.
How To Update Details Photo?
Q29.
How To Delete Audio/Video?
Q30.
How To Add New Audio/Video Item?
Q31.
How To Delete Audio/Video Item?
Q32.
How To Update Audio/Video Details?
Q33.
How To Add New Digital Content?
Q34.
How To Delete Digital Content?
Q35.
How To Update Detail Digital Content?
Q36.
How To Generate All Patron Report?
Q38.
How To Generate Statistics Report?
Patron
Q1.
How To View Personal Account Activities?
Q2.
How To Extend Library Items?
Q3.
How To Reserve and Cancel Reservation of Book Items?
Q4.
How To View Account History?
Common
Features
Q1.
How To Edit Personal Profile?
Q2.
How To Set The Search Preference?
Q3.
How To Change Password?
Q4. How To Search for Book Using OPAC (Simple Search)?
Q5.
How To Search for Audio/Video Using OPAC (Simple Search)?
Q6. How To Search for Digital Content Using OPAC (Simple Search)?
Q7.
How To Search for Photo Using OPAC (Simple Search)?
Q8. How To Search for Serial Using OPAC (Simple Search)?
Q9.
How To Search Book Using OPAC (Advanced Search)?
Q10.
How To Search Serial Using OPAC (Advanced Search)?
Q11.
How To Customize Order – Administrator?
Q12.
How To Configure Budget Control?
Q13.
How To Customize Order – Officer?
Q14.
How To Customize Update Cataloging?

